
Accolent ERP’s physical inventory system allows you to take a physical count of your inventory by Cycle Counts or a Full Count by product. The physical inventory system involves a number of sequential steps that must be performed in order. This is the first of six wikis that explain the Inventory Counting process.
Sequence of Wiki Posts
- The Physical Inventory system is explained in 6 wikis that lay out the sequential series of steps involved. Read the wikis in this order:
Preparation
- You will be comparing the counted quantities to the Quantity on Hand (QOH) shown in the system.
- Since QOH is affected by every transaction, you should attempt to complete all possible Invoicing, PO Receiving and other similar transactions before you start.
- Then once you start your counts, do not process any transactions of this type until all physical inventory counts have been completed and accepted.
Sequence of Steps
- The physical inventory system consists of a series of steps that must be completed sequentially in order, and you must not skip any steps.
- The menus under Physical Inventory reflect all the steps in order from top to bottom.
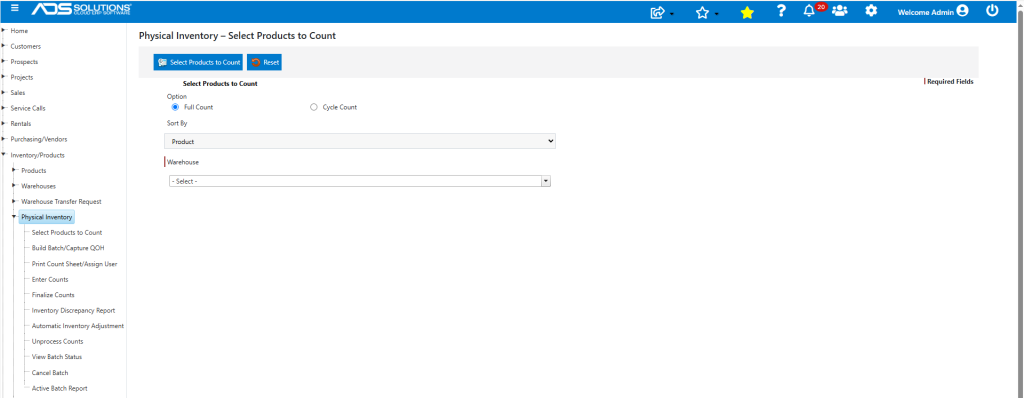
Step 1: Select Products to Count
- Use options to select the population of products to be counted.
- There are various options available that are detailed in the wiki on Selecting Products to Count.
Step 2: Create Batch/Capture QOH and Print Count Sheets
- Once you have selected the products to count you need to create a Batch which will include all these selected products and capture the current QOH for these. Once the Batch has been created and the inventory frozen, there should be no more transactions entered that affect the inventory of the products selected to be counted.
- Count Sheets break up a Batch (which might include thousands of products) into individual Count Sheets of no more than 500 items each.
- This breaking up of a Batch into Count Sheets is done automatically by the system based on Product Code.
- The Count Sheets can then be printed and distributed to the warehouse personnel that will do the counting.
Step 3: Enter Counts
- Once the Count Sheets are returned from the warehouse personnel, the quantities on each Count Sheet should be entered into Accolent ERP then Saved.
- It is also possible to pull up a specific Batch and Count Sheet in WMS and enter the counted quantities directly rather than on a printed sheet.
- Each Count Sheet will have a unique identifier.
Step 4: Finalize Counts & Process
- Once all Count Sheets have been entered, select Finalize Counts to process.
- This must happen ONLY when ALL Count Sheets are returned.
- The Finalize Counts step must be completed before proceeding to the Inventory Discrepancy reporting.
Step 5: Recording Results of Inventory Counting
- Once counts are finalized, you should generate the Inventory Discrepancy Report, which compares the counted quantities to the QOH.
- The Inventory Discrepancy Report needs to be reviewed and confirmed before recording the Inventory Adjustments.
- If a recount is necessary, use the Unprocess Counts option, then:
- Print the count sheets for the products to be recounted.
- Reenter the new counts when completed. It is not necessary to reenter counts for Count Sheets where the counted quantities are correct.
- Once the counts are re-entered and processed, the Inventory Discrepancy Report can be re-run.
- The above series of steps can be repeated as many times as necessary until the counts are correct.
- When satisfied, the last step is to complete the Automatic Inventory Adjustment to update the Inventory with the new quantities.
- There is no easy way to reverse the Inventory Adjustments, so this step needs to be effected only when the counts are confirmed.
- Each affected product’s Inventory Ledger will be updated with a Count Adjustment to reflect the difference between the counted quantity and the QOH.
- A General Ledger posting will be made to reflect all the adjustments.
Utilities
- To view the last step that has been processed for a Batch use the option “View Batch Status”.
- If an entire Batch must be cancelled, use the option to Cancel Batch, which will remove all entries made for the count sheet(s) and will remove the count sheets as well.
- If you have to restart, you will have to complete the whole process again.