
Accolent ERP runs in the AWS Public Cloud and uses PrintNode, an enterprise-grade cloud printing solution, to print from the Cloud. To use PrintNode, download the PrintNode client onto the printer server. The printer server should have an always open connection to the Internet and all the printers should be linked through the printer server for easy trouble shooting. The second step is to add all the printers set up in PrintNode to Accolent ERP. After adding the printers, the final step is to create Printer Groups and Assign Forms to Default Printers as described in this wiki.
These wikis, detail the process:
- Setting up Accolent Cloud Printing (PrintNode)
- Adding Printers to Accolent ERP
- Setting Printer Groups and Assigning Forms
Adding a New Printer
- Go to Settings > Printing & Sending > Printer Master List.
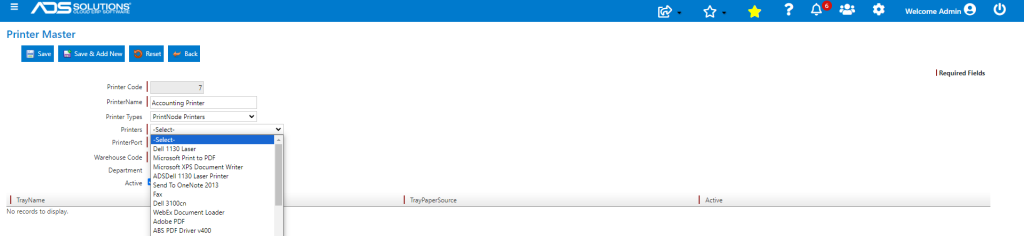
- To add a new Printer, click on the New button on the screen.
- Accolent ERP at one time allowed for 4 types of printers: Network Printers (LAN), Internet Printers (WAN), Google Printers (that used Google Cloud Print) and PrintNode Printers. However, since Accolent ERP now runs only in the AWS Public Cloud, and Google has discontinued Google Cloud Print, you must select PrintNode Printers.
- Once you select the type as PrintNode Printers you will see the printers set up in PrintNode as available.
- Once you save the information, the Printer Master List screen would show the newly added Printer.
Listing of Printers
- To get a list of the Printers that are set up in Accolent ERP go to Settings >Printing & Sending > Printer Master List
- The Printer List screen will display all the existing Active Printers by default

Searching for Printers
- In the Advance Search, the user can filter by Active and/ or Inactive printers in addition to the Printer Name and Printer Type
