
Customers in Accolent ERP are master records (as are Vendors, Products). Master records are supported by Value Lists, which detail all allowed values for various entries on the master record. In order to properly set up a Customer record, all associated Value Lists (e.g., Customer Type, Ship Via, Warehouse, Salespersons, Terms) must already have been set up. Then you can set up a new Customer record.
Set up a New Customer
- From Customers > Customers > Create Customer
- All required fields marked with |need to be filled in
- See below for a description of the key fields
General Tab
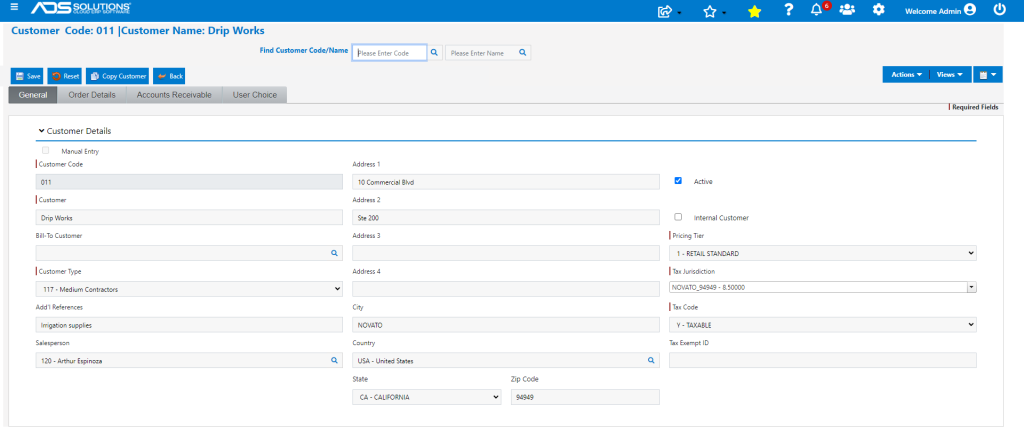
Customer Code
- Each customer is assigned a unique Customer Code.
- For customers with multiple locations (usually a primary bill-to location and multiple ship-to locations), enter a separate customer record for each Bill-To and Ship-To.
- Enter a Customer Code by checking the Manual Entry checkbox or allow the system to generate.
- Customer Code can be 20 characters maximum.
- Only alpha characters/numbers/special characters (@,-,_,.) are allowed.
- You probably want to give this some thought as random numbers and characters that auto would assign serve little purpose.
Customer Name
- Enter a Customer Name.
- Cannot have special characters.
Bill-To Customer
- If this customer is a Bill-To customer do not make no entry in this field.
- Bill-to customers should be set up before ship-to customers.
- If this customer is a Ship-To, enter the number of the bill-to customer here; this will link the Ship-To and the Bill-To customers for all sales analysis and related data.
- Normally orders for a Ship-To are processed through the Bill-To Customer.
Customer Type
- Before you can select a Customer Type from the dropdown, the allowed types will have to be set up as a value list.
- To get to value lists, select Settings > Value Lists > Other Value Lists (A – L) > Customer Types.
Add’l References
- Enter additional words you want to use to cross reference or search on for this customer; these can be any combination of letters and/or numbers separated by spaces and will help you locate these records when you search.
- For example, for customer “PG&E” you might choose additional cross reference: PGE Pacific Gas Electric.
Salesperson
- Before you can select a Salesperson from the dropdown, the salesperson will have to be set up.
- Specify the salesperson associated with this customer.
Address
- Fill in Address lines 1 through 4 (if needed).
- Enter City, select State from dropdown, enter Zip Code and select Country.
- If Zip2Tax is being used for sales tax, the Zip Code is required.
Active checkbox
- This checkbox should be checked.
- If unchecked this makes a customer record inactive.
Internal Customer
- This checkbox denotes whether this is an Internal Customer to receive Warehouse Transfers or not.
Pricing Tier
- Before you can select a Pricing Tier from the dropdown, the pricing tier will have to be set up as a value list.
- Determines the customer’s discount for products where discounting is offered by through price lists.
Tax Jurisdiction
- Before you can select a Tax Jurisdiction from the dropdown, the tax jurisdiction will have to be set up as a value list.
- Enter the default tax jurisdiction code applicable to this customer.
- Each ship-to and bill-to customer will have its own tax jurisdiction code assigned.
- You can also create “split tax jurisdictions”.
Taxable Status
- Before you can select a Tax Status from the dropdown, the tax status will have to be set up as a value list.
- Refers to sales tax that may apply to any sales made to this customer.
Tax ID
- Enter customer’s tax exempt number if the customer is exempt from sales tax.
Order Details Tab
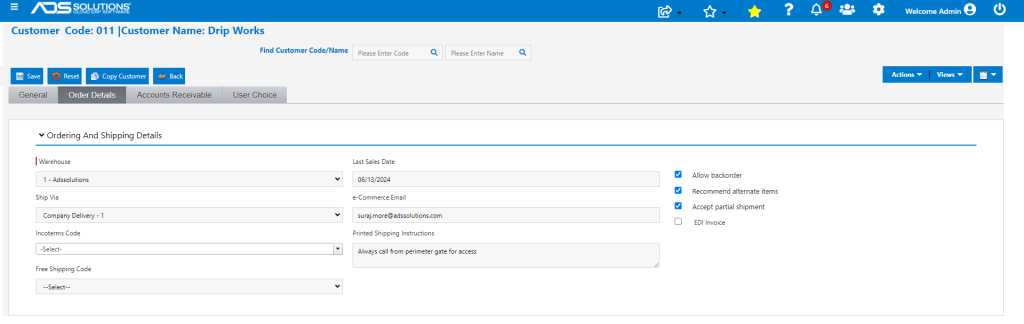
Warehouse
- Before you can select a Warehouse from the dropdown, the warehouses will have to be set up.
- Specify the default warehouse that normally supplies this customer.
Ship Via
- Before you can select a Ship Via from the dropdown, the allowed shipment methods will have to be set up as a value list.
Incoterms Code
- Select the Incoterms Code that applies.
- Typically, this is only needed for international transactions.
Free Shipping Code
- This may be used to designate which transactions qualify for free shipping.
Last Sales Date
- Displays the date of the last order for this customer.
eCommerce Communication Email
- Used in Self-Service Portal if users all have generic emails.
- Used in Online Stores for the unique email address that defines that customer.
Printed Shipping Instructions
- Enter shipping instructions that will print on the Pick ticket, Pro forma Invoice and Invoice forms.
- Use alphanumeric characters.
Allow Back Order checkbox
- If checked, allows creation of Back Orders for this customer or if the customer has no preference.
- If unchecked, no Back Orders will be created.
Recommend Alternate Items checkbox
- If checked, means the Customer accepts substitute products; during the order entry, when a specified item is out of stock, system will prompt with alternate items.
- If unchecked, Customer does not accept substitutes and alternate items will not be prompted.
Accept Partial Shipment checkbox
- If checked, allows partial shipments for this customer or if the customer has no preference.
- If unchecked, no partial shipments will be allowed.
Accounts Receivable Tab
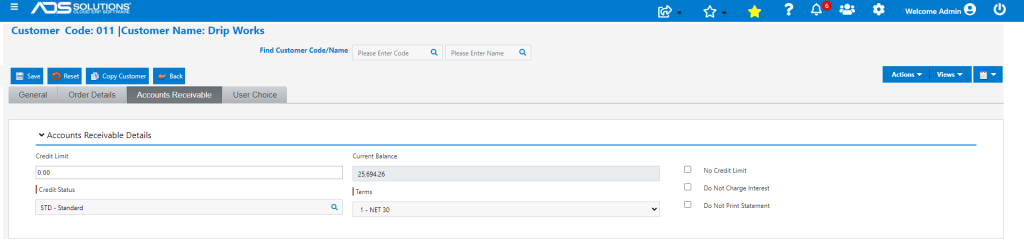
Credit Limit ($)
- Enter the customer’s credit limit; enter 0 if the customer’s credit limit is zero.
- Make no entry if the customer has unlimited credit.
- All open orders are considered along with open invoices when calculating the credit limit during order entry.
- Authorization is needed to process immediate invoices when the customer is over the credit limit.
- Two-step orders are put on-hold until released or until the credit situation has been cleared up.
Credit Status
- Before you can assign Credit Statuses from the dropdown, these will have to be set up as a value list.
Current Balance
- Displays the current balance owed by the customer.
Terms
- Before you can select payment Terms from the dropdown, the list of allowed payment terms will have to be set up as a value list.
- Specify the default terms code that applies to this customer.
No Credit Limit
- Select this checkbox if Customer has no Credit Limit.
Do Not Charge Interest
- Select this checkbox if the Customer is not charged interest on overdue balances.
Do Not Print Statement
- Select this checkbox if Customer does not receive a printed statement.
User Choice Tab
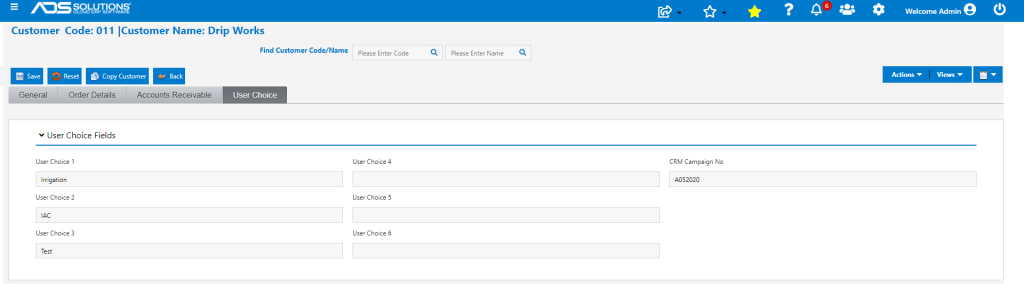
User Choice Fields
- User Choice fields can be used to store specific types of information you want to collect.
- The User Choice fields can be edited to display user-entered label.