
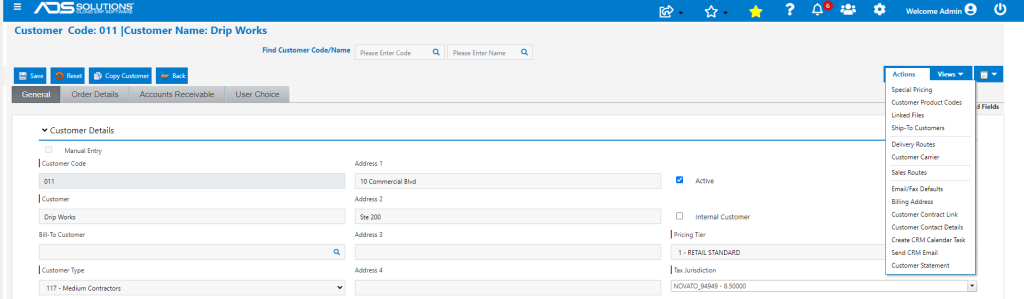
There are several menus available from the Customer screen by clicking on the Actions button on the top right hand side of the screen. These menus allow the user to take a series of actions related to this customer.
Customer Actions
- From the Customer select Actions to see a number of menu options.
- These menus provide information specific to this customer.
Special Pricing
- Special pricing is a price discount that applies to an individual product, a group of products (product category), or all products (overall discount) for a single customer.
- A special price discount is a percent discount that is on top of other discounts awarded.
- Special prices can be defined by Bill-To and/or Ship-To Customer code. The rules defining how special prices between Ship-To and Bill-To Customer codes interact is controlled by a system setting.
List Special Prices
- The Special Prices screen shows a list of all special prices for this customer.
- Shared special prices, category discounts, and an overall price discount can also be applied.
| Buttons and Functions | Description |
| Add | Add a new special discount to a product or a category. |
| Shared | View a shared list of price discounts by entering the shared list ID. After entering a shared list ID, the display now listed will show products and categories for that shared list. |
| Overall% | Overall percent discount for this customer. An overall discount adds a percentage discount after every other discount has been applied. |
| Remove | Remove a special price. |
| Standard Search | Search for a record. |
Special Prices: Display Area
| Fields and Functions | Description |
| Edit or View Details | To see further detail or edit a record, click on the corresponding code (link). This will open the record. After editing, click on the Save button to save the changes to the record. |
| Sort | Sort allows user to reorder the elements in the grid. |
Special Prices Details: Add a Product
| Buttons and Functions | Description |
| Save | Save the record. |
| Add Category | Add a discount for a category (rather than a product). See Special Prices Details: Category |
| Reset | Reset all entries on the screen. |
| Back | Return to prior screen. |
Special Prices Details Product: Fields
| Fields and Functions | Description |
| Shared Code | Shared special price list code that this product will be added to. |
| Product Code | Product to apply discount to. A value in this field is required. |
| Description | Product Description is automatically displayed. |
| Unit of Measure | Unit of measure for selected product is automatically displayed. |
| List Price ($) | List price for selected product is automatically displayed. |
| Percent (%) | Percent to discount from price. |
Special Prices Details: Add Category
| Buttons and Functions | Description |
| Save | Save the record. |
| Add Product | Add a discount for a product (rather than a category). |
| Reset | Reset all entries on the screen. |
| Back | Return to prior screen. |
Special Price Details Category: Fields
| Fields and Functions | Description |
| Category | Product to apply discount to. A value in this field is required. |
| Description | Category description is automatically displayed. |
| Percent (%) | Percentage discount to apply to this product in format 0.00% |
Customer Product Codes
- The Customer Product Code screen lets you build and maintain a list of product codes and the corresponding product code used by your customer in their business.
- If you deal with the government and get purchase orders with GSA codes on the purchase order, you can cross reference the GSA codes to your internal codes.
List of Customer Product Codes
- The Customer Product Codes list shows the products that have been associated a customer product code including information from the time the product was sold to this customer.
Customer Product Code Details: Fields
| Fields and Functions | Description |
| Customer Product Code | Customer’s identifying product code. |
| Our Product Code | Internal product code that corresponds to the customer’s code. Manually enter an existing product code or use the Look Up screen. |
| Product Image | Image associated with the product. This helps insure that the correct product is selected. |
Customer Product code Details: Display Area
| Fields and Functions | Description |
| Customer Product Code | Customer’s identifying product code. |
| Product Code | Internal product code that corresponds to the customer’s code. Manually enter an existing product code or use the Look Up screen. |
| Description | Product description (automatically displayed based on Product Code). |
| Category | Product category (automatically displayed based on Product Code). |
| Sub-Category | Product sub-category (automatically displayed based on Product Code). |
| Last Invoice No | Invoice number of the most recent sale of this product to this customer. |
| Invoice Date | Invoice date of the most recent sale of this product to this customer. |
| Quantity | Quantity of the most recent sale of this product to this customer. |
| Last UOM | UOM of the most recent sale of this product to this customer. |
| Last Price ($) | Sale price of the most recent sale of this product to this customer. |
Linked Files
- Link a file to the customer record.
- Linked files can be images or documents such as agreements, customer information sheets, or proposals.
- Linked files are available for customers, products, vendors, prospects, salespersons and transactions.
Ship-To Customers
- Bill-to customers are associated with one or more “ship-to” customer records.
- All of the ship-to customers associated with a bill-to are displayed on this screen, and these can be removed or added to.
- Generally, this is a good method of separating billing and shipping addresses for a given customer if the customer has many branches.
- The biggest advantage of this method is that sales history for the bill-to and ship-to records are kept separately. In other words, you can see the sales history consolidated for all branches, or look at sales history for one specific branch.
- This method requires setup of a main bill-to record for the customer and a separate ship-to customer record for each branch/job. At order/quote entry time, you will create the transaction in the bill-to record and pick the correct ship-to from the Ship-To Look Up button on transaction General tab.
Ship-To Customers Details: Fields
| Fields and Functions | Description |
| Ship-To Code (link) | Click the “Ship-To Code” link to reach the Customer Quick Entry screen to quickly add a new customer record. More: Customer Quick Entry |
| Ship-To Code (field) | Ship-to Customer code. Enter a code manually or Look Up a code. |
| Name | Customer name is automatically added based on the Ship-To Code. Use this field to verify that this is the correct customer to add as a ship-to. |
| Address 1 – 4 | Customer address lines are automatically added based on the Ship-To Code. |
| City | Customer city is automatically added based on the Ship-To Code. |
| State | Customer state is automatically added based on the Ship-To Code. |
| Zip Code | Customer zip code is automatically added based on the Ship-To Code. |
Delivery Routes
- Delivery route values (created in the Delivery Route Value List) can be assigned to a customer’s record.
- Orders can be sorted or selected by delivery route to aid with transporting orders to customers.
Delivery Routes Details: Fields
| Fields and Functions | Description |
| Delivery Route Code | ID Code for delivery route. Select the code to assign to this customer. |
| Description | Description of delivery route. |
Customer Carrier
- This allows specification of the customer’s preferred shipping carrier and service.
- By entering the customer’s account number with the shipping carrier, freight charges can be billed directly to the customer’s account at the rates the customer has negotiated with the shipping carrier.
Customer Carrier: Display Area
| Fields and Functions | Description |
| Edit or View Details | To see further detail or edit a record, click on the corresponding code (link). This will open the record. After editing, click on the Save button to save the changes to the record. |
| Sort | Sort allows user to reorder the elements in the grid. |
| ID | ID for this record. |
| Customer Code | Customer code. |
| Shipping Provider | Shipping provider name. |
| Shipping Provider Service | Shipping service selected. |
| Account Number | Customer’s account number with shipping provider. |
| Meter Number | Customer’s meter number with shipping provider. |
| Developer Key | Customer’s developer key obtained from shipping provider. |
Customer Carrier Details: Fields
| Fields and Functions | Description |
| Edit or View Details | To see further detail or edit a record, click on the corresponding code (link). This will open the record. After editing, click on the Save button to save the changes to the record. |
| Customer Code | Customer code. |
| Shipping Provider | Select shipping provider name from dropdown. Select from FedEx, UPS, USPS or Other |
| Shipping Provider Service | Select shipping provider service from dropdown based on shipping provider selected. |
| Account Number | Customer’s account number with shipping provider. |
| Meter Number | Customer’s meter number with shipping provider. |
| Developer Key | Customer’s developer key obtained from shipping provider. |
| Password | Customer’s account password. |
Sales Routes
- The Sales Route screen should be used to add sales routes to a customer’s record.
- In the Call Frequency field, enter the number of days between sales calls for this customer.
Email and Fax Defaults
- Email and fax “defaults” are pre-defined lists of contacts and your preferred method of sending certain types of forms.
- For example, for every statement sent to a customer you can pre-define that the statement is emailed to the accounts receivables contact’s work email address and the statement is also faxed to the accounting contact at his/her headquarters fax number.
- By pre-defining these preferred sending methods, groups of statements or invoices for multiple customers will automatically be routed to the correct contact people.
- When printing a form, Email/Fax Defaults are used when “automatic” or “default” settings are selected.
- The associated Email/Fax Template is sent with the form.
- Before assigning these defaults, first set up email/fax templates. These are “cover letters” that will be sent with the corresponding form.
Billing Address
- Customer Billing Address can be used to optionally add a billing address to this customer record. This address will be used on transactions as the billing address.
- The address on the main customer record should be the physical address to be used as the shipping address.
- A contact name and phone number can be added here so the screen can serve as a quick reference for billing-related information.
- Use this screen if you need to send invoices for this customer to a PO Box, property manager, a responsible party or a corporate office in a different city.
- A billing address is not the same thing as a “bill-to” record. A “bill-to” record is a separate record of a headquarters that may have multiple “ship-to” locations.
Billing Address: Fields
| Fields and Functions | Description |
| Name | Company name to use for billing. Include a value here that will be included in the billing address. Note that the values on the Billing Address screen will be used if there is a value in the Name field so be sure to complete the screen or remove values from the Name field. |
| Address 1 | First company billing address line. |
| Address 2 | Second company billing address line. |
| City | Company billing address city. |
| State | Company billing address state. |
| Zip Code | Company billing address zip code. |
| Contact | Company billing contact person. |
| Phone | Company billing phone number. |
Customer Contract Link
- Contracts may be created for any product or group, category or subcategory of products, or for a Vendor.
- Contracts are created from Settings > Value Lists > Other Value Lists (A to L) > Contract Master List.
- Once created one or more contracts may be linked to the Customer from the Customer Contract Link screen and the user can specify the priority in which the linked contracts are applied for this customer.
- Contracts are applied in the following hierarchy:
- Contract price for a product on a customer’s individual contract
- Contracts for specific parts
- Contracts by category
- Contracts by sub-category
- Contracts by vendor.
Customer Contract Link Screen
- To link a contract already set up in the Value Lists to this customer, use the Customer Contract Link screen.
Customer Contract Link: Fields
| Fields and Functions | Description |
| Checkbox | Mark checkbox in order to select contract to link to this customer. Once selected, priority may be assigned. |
| Contract No | Contract number assigned when the contract was created. |
| Description | Contract description entered. |
| Type | Contract type: Product, Category, Sub-category or Vendor. |
| Priority | Priority entered by user that will specify the order in which the linked contracts are applied in order to determine a price. |
| Linked Date | Date contract was lined to this customer. |
| Modified By | User name of last modifier. |
Create CRM Task
- CRM Tasks can be created to follow up with Customers and Prospects.
- The CRM Tasks can be assigned to any Accolent ERP user and will show up on a shared Google calendar for that user
- CRM Tasks can be created from a number of places in the system including the Customer > Actions menu.
- CRM Tasks can be linked to any transactions for that Customer or Prospect that are in the system.
Send CRM Email
- CRM emails are stored in the system and are part of the Recent Interactions with the Customer.
- From the CRM Emails screen a customized email can be created and sent to the Customer.
- For example, a CRM email could be used to track communications with the Customer about a pending sale transaction.
Customer Statement
- From the Customer Statement menu, a current statement can be generated and emailed to the customer.