
Accolent ERP assigns permissions to users based on Roles. Access Rights to every menu and screen within the application, Ability to Run Reports, Settings and Access to Widgets can be controlled within the definition of a Role. Accolent ERP accepts an unlimited number of Roles. Once a Role is defined one or more Users can be assigned to the Role.
Roles and Pre-Defined Standard Roles
- Roles control permissions to view and change most screens and some fields.
- In addition, roles control whether certain processes or reports can be run.
- Each User (person logged in to Accolent ERP) is assigned to certain roles that control available menu options.
- Accolent ERP includes several pre-defined Roles which are structured around common work tasks; these are provided for convenience only and can be modified or deleted.
- The standard Roles include:
- All Rights,
- Order Entry,
- Salesperson,
- Sales Manager,
- Purchasing Manager,
- Warehouse Manager,
- AP Entry,
- AR Entry,
- Accounting Manager.
- The All Rights role will be needed to modify other roles and or assign permissions and users.
Configuring Roles
- A User with All Rights can then create additional Roles and/or modify existing Roles.
- The system is delivered with several standard Roles which can be modified as needed.
- To see the Roles set up, go to Settings > Roles > Roles List.
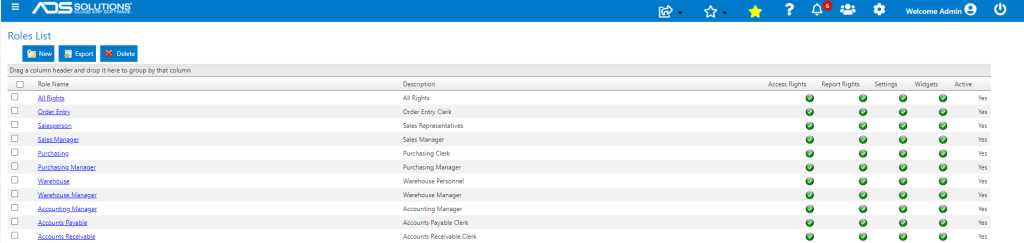
- Each Role requires specification of each the Access Rights, Reports Rights, Settings and Widgets.
- Access Rights control all primary and secondary menus, screens and fields in the system, allowing the Role permissions to be defined at a very granular level.
- Report Rights control the ability to view and/or edit every report in the system. Be sure to exclude reports that may provide information that you do not wish this user to see, for example, if you restrict General Ledger menu access rights, be sure to restrict access to the General Ledger reports.
- Settings are field specific functions to allow or block. An example would be the ability to override the payment terms for a customer during Order Entry, or the ability to over-receive a purchase order line.
- Widgets are the small, interactive windows that appear on the Home page and Dashboard screens. Not all widgets are appropriate for all roles. Select the widgets that users assigned to this role will access. Note: a User may select from the list of available widgets assigned to his/her role.
- Each of these elements of a Role will show a green check icon or a red x icon to indicate whether they have been properly defined
- To change the permissions for any Role, click on the corresponding icon to show the permissions which can then be modified
- Expand the arrow to the left of the Name field to see specific options under each primary menu. Some functions will have multiple levels to expand
- A check mark in the “Change” box allows editing. A check mark in the “View” box allows viewing only.
- To see the Access Rights set up, go to Settings > Roles > Access Rights.
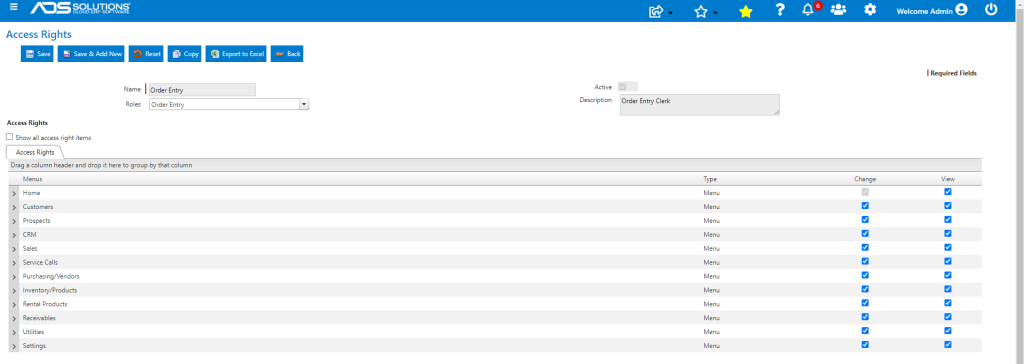
- The configuration of roles can be defined completely to suit your needs. Many users of Accolent ERP find that simply restricting the primary menus is sufficient, while others establish very detailed permissions
- To add additional menus or functions, it is necessary to click the “Show all access rights” button under the “Access Rights” heading. This will display all menus and features, then select the appropriate items to add
- Roles are very detailed records and can take some time to open, copy, and save
Assigning Users to Roles
- From the User screen, a User with All Rights can assign a Role to a User.
- Roles that have already been set up will show up as checkboxes on the User screen.
- To assign a specific User to a Role, click on the appropriate checkbox in the Role section.
- You can assign the User to as many roles as fits his/her job profile. For example, if Dick needs both the Purchasing Manager and the Warehouse Manager access, assign him to both roles.
- From the User screen, the All Rights Role can change the User’s password or log off the User.
- Note that Any User may change his/her own password at any time by clicking on the Profile link at the top right-hand side of the screen.
- Any User can be logged in only once at any time; if a logged in User tries to log in again, he/she will be asked whether to terminate the prior log in session.
- For more information. See this wiki: Creating Adding or Editing Users.