
Users must first be created by an All Rights User and assigned Roles and Permissions. Once Users have been created, they can log in to the Accolent ERP system and can access the areas of the system for which they have been given permissions. Permissions can include “view only” permission and “change” permission. Permissions are set for a role and then a user may be assigned to a role. A user must be assigned at least one role.
Creating Users
- Users must be created by an All Rights user which will be set for your system.
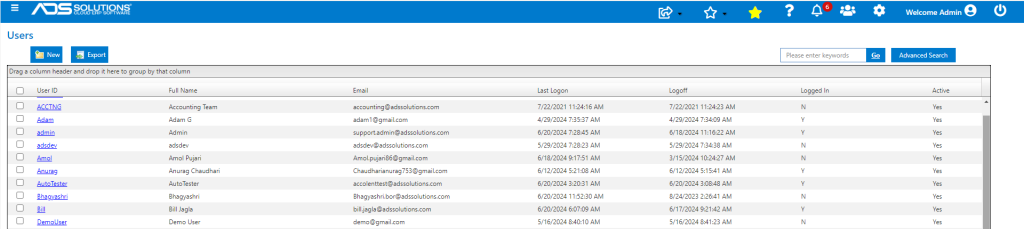
- To set up Users, the All Rights User can go to Settings > Users to see the Users List screen.
- The Users List screen lists all Active Users. To see the Inactive Users, select that checkbox in the Advanced Search.
- NOTE: Any user who is assigned to a role with access to change the Roles screen or the Users screen can change his or her own permission level.
- To create or edit users, go to Settings > Users > Users List and click a user ID or click New to create a new record.
- The number of Active Users at any time will be limited to the number of users licensed.
- Any User can be made Active or Inactive by clicking on the hyperlink on the User and checking or unchecking the Active checkbox.
- ADS Solutions has a user named “Admin” that is not counted against the Active Users for purposes of counting licensed users. The Admin user is used to make changes to the software and/or to provide software support when requested.
- This opens up the User Details screen.
Adding or Editing a User
- To add a User, click on the New button.
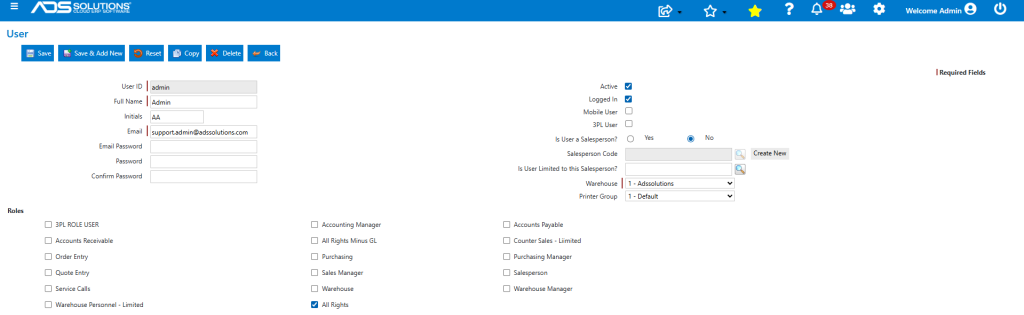
- This opens the User Details screen allowing entry of the new User’s data into the required fields.
- User ID: Unique identifier for user. Used along with password to log in to Accolent ERP. The user ID cannot be changed after the user is created. There are no syntax rules for the User ID, and it is not case sensitive.
- Full Name: Actual name of this user. The full name of the user will often be shown on screen and in reports to identify who performed a task.
- Initials: Used by the system internally.
- Email: Email address for user is a required field. If this user does not have an email address, please enter a generic company email such as “customersupport@xxx.com”. This email address is used on any automatically generated emails from transactions generated by this user. This will be used as the “reply to” and “from” address when the user sends email messages.
- Password: User password used with User ID for logging into Accolent ERP. Strong passwords are required that must be at least 8 characters long and contain at least: one upper case letter, one lower case letter, one number and one special character (e.g., !, @, &).
- Confirm Password: Verify change to Password field. When a change is made to the Password field, the same password must be entered in the Confirm Password field to verify the change.
- Active: Click this box if the user is currently allowed to access the system. You may choose to temporarily suspend access at some time, and unchecking this box will block the user from logging on.
- Is User a Salesperson?: This field indicates whether the User is a Salesperson or not.
- Salesperson Code: If User is a Salesperson this field specifies the Salesperson linked to the User.
- Is User Limited to this Salesperson?: This field has a specific use and will not be entered for most users. Its purpose is to record users that are also salespersons. If the business practice of your company is to restrict salespersons to only their assigned accounts, enter the salesperson number here. Then when logging on, this salesperson will only be allowed to access customer information for customers that are assigned to this salesperson number. For example, Sarah Jones logs on as “Sarah”, but is also Salesperson 100. Salesperson 100 is assigned to 50 customers. An entry here will limit Sarah’s access to only those 50 customers. This field cannot be changed in the User Profile screen. It can be changed in the User Details record.
- Warehouse: Each user must be assigned to a home warehouse. This value will default to certain screens within the application but may be overridden with permission. Accolent ERP is delivered with one “default” warehouse. If you have not yet entered your Warehouse master records, assign the user to the default warehouse.
- Printer Group: Each user must be assigned to a “printer group”. This controls which printers the user has access to, and which printers are used for which forms. Accolent ERP is delivered with one “default” printer group. If you have not yet entered your Printer Group records, assign the user to the default printer group.
- Roles: See wiki on Creating Roles and Permissions for Users.
User Profile and User Detail
- When a User logs in to Accolent ERP, the user will have access to the User Profile screen.
- The User Profile screen is available from the User Section at the top right section of the screen, under the people icon.

- The User Profile screen does not include the ability to add or remove roles but does allow the user to change the log on password when necessary.
- The User Detail screen available from the Settings menu and includes the ability to add or remove roles.
Assigning Users to Roles
- Click on the hyperlink for any User ID to open the User screen.
- From the User screen, that User can be assigned to any already existing Role by checking the appropriate checkboxes.
- A user may have more than one assigned Role
Remove Users from Role
- To remove a User from a Role, click on the hyperlink for that User ID to bring up the User screen.
- Then, uncheck the checkboxes for the Role(s) to be removed.