
Accolent ERP is a web services-based software system that runs in the Amazon Web Services Public Cloud. Users connect to Accolent ERP by accessing a URL over the Internet. Users can access the Accolent ERP software from any device that can run a standard web browser, and Accolent ERP supports all the main web browsers including Google Chrome, Mozilla Firefox and Edge. Since browser functionalities are constantly being changed, we recommend using Google Chrome.
System Organization Summary
- Broadly speaking, the Accolent ERP’s functionality is divided into these areas:
- Customers and prospects,
- Sales and ordering (quotes, orders, invoices) and fulfillment,
- Vendors, purchasing and purchase orders, and receiving,
- Products, inventory process (physical inventory) and warehouse management,
- Accounts receivables, accounts payables, and general ledger,
- Reports, and
- Utilities and Company Settings.
- Each of these areas is broken down further into functional areas and specific tasks.
Roles and Permissions
- To access Accolent ERP, each “User” must have log on credentials and the User record controls permissions, passwords, and some system default values.
- In Accolent ERP, a user’s abilities or permissions are restricted by the roles the user is assigned to. Roles control the user’s ability to:
- View or change screens (also known as “pages”),
- View or change values in some fields, and
- Run certain processes.
- The system includes several pre-defined roles which are structured around common work tasks.
System Manager Role
- The System Manager role login includes permissions to access all screens, fields, and processes.
- Because this role allows access to the whole system it should be used carefully.
- NOTE: Any user with the ability to “Change” the Roles page can adjust permissions for his/her role as well as any other role.
User Preferences Summary
- Every user can customize the appearance and organization of his/her screens including:
- Themes – page colors and styles throughout Accolent ERP,
- Dashboard Widgets – mini-reports that often link to more detailed reports or processes.
- Shortcuts – quick links to often-used screens,
- Favorites – link to user-defined favorite screens and transactions,
- Recent Items – list of recently accessed types of transactions,
- Printer Group – set initial values when printing, and
- Favorite Reports – define favorites for quick access in Report Center.
- Each user will see only the menu items that they have permission to see based on his/her assigned role.
Logging In and Logging Out
- The Accolent ERP system comes with user set up with All Rights permissions.
- Any current browser can be used to access the system, but the system is optimized for Google Chrome.
- Each system can have a maximum number of Active users based on the subscription, at the same time.
Logging In
- To log in a user will open a browser and go to the Accolent log in screen.
- The address of this screen will be provided to you during implementation.
- The log in screen requires a one-word user name that is not case sensitive and a one-word password that is case sensitive.
- The system administrator can reset users’ passwords if these are forgotten or compromised.
Multiple Sessions and Browser Behavior
- A user can log in once using the same username and password; however, the user can open multiple browser tabs accessing the software.
- All these tabs are the same user session and care must be taken not to overwrite records when using multiple tabs.
- If the user logs in from another computer with the same username and password, the user’s first login will be terminated.
Multiple Sessions Best Practices
- It is strongly recommended that a user log in only once on a browser.
- A user should not open multiple windows or tabs of the same browser to run Accolent ERP since each browser instance is a single session, running multiple windows or tabs in the same browser can cause loss of data or “screen switching” where a new window reverts to the same screen that is open in another window.
- Open a separate browser to log in more than once from the same computer. For example, if you have logged in on Google Chrome open a new browser such as Mozilla Firefox before logging in again.
Browser Best Practices
- Although it is possible, avoid using the browser’s back and forward buttons for navigation.
- The Accolent ERP menus, Back buttons, and shortcuts should be used instead.
- Opening additional sessions of Accolent ERP in multiple windows or tabs of the same browser is not recommended.
Time Outs Due to Inactivity
- A user time out setting prevents users from staying logged in without activity for extended amounts of time; this is a data security requirement.
- A user is warned a designated number of minutes before a time out and will have the opportunity to stay logged in by responding to the warning within that time.
Logging Out
- To exit the software, a user should click the Logout button in the User Menu area in the top right corner of every screen.
Types of Screens: Lists, Records, Transactions, and Processes
Screen Types
- Within the associated menu areas, are lists of records such as customers and detail screens.
- Transactions like invoices and purchase orders are also shown in lists and detail records.
- Process screens like reports, utilities, and physical inventory general start with a “filters,” that allow the user to narrow down the information under review (such as the date range for items on the report) by entering values then processing it with the Select or Go button; the report or set of items under consideration is then displayed on screen for further refinement or export.
List and Look Up Screens
- List screens show lists of records or transactions and serve as the starting point for many activities such as finding items through sorting, browsing or simple and advanced searches, editing existing items, and creating new items.
- Look Up screens are specialized list screens available from the Look Up button ().
- Lookup screens let you look up a value such as a shipping method like “Common Carrier” or a record such as a customer like “Washington High School.”
Active and Inactive Items
- Items can be marked as Active or Inactive by checking or unchecking the Active check box on the record screen.
- Active records and value list items are displayed on list screens.
- Active records are available to be used on transactions.
- Since inactive records are not available for use in transactions, inactive records do not display on the list screen.
- To view inactive records, perform an advanced search and select the check box for inactive records; keeping inactive records hidden eliminates the unnecessary clutter from records that are not often used.
- Keeping an Inactive record allows past information to be available, if needed.
Creating New Items
- Often there are menu options to directly create new records such as Create Customer, Create Order, and Create Salesperson. Many screens also have a New (
 ) button that lets a user create a new record. Both methods will open a blank record.
 - Manually enter an identifying “code” or “transaction number” or uncheck the Manual Entry check box to automatically enter a code.
- Fields that must be completed (“Required Fields”) are marked by this symbol ( | ).
- New customer, product, vendor, and prospect records are based on a “DEFAULT” record. For example, if 90% of your customer base is located in “New York, NY,” this can be set up in the Default Customer record; similarly, these customers might all be serviced from the same warehouse.
- To make changes to the DEFAULT record, log in as the Admin user and perform an Advanced Search for the code “DEFAULT.” Select the record to open it and edit. Save changes before leaving the record. No fields are “required fields” for the DEFAULT record.
Editing Items
- To open an existing item to view details or edit the record, click on the appropriate link on the list screen. This will open the record.
Save Button
- After editing or creating a new record, click on the Save button (
 ) to save the changes to the record.
 - Leaving a screen by clicking a menu option from the Main Toolbar or by clicking the Close window button (
 ), means that all unsaved data will be lost.
 - When changes have been saved successfully, you’ll receive a message that your changes were saved. You may also get information about transactions that were created or moved to a new stage.
- On some screens, when a save is successful, the screen will redirect to the List screen to make it easier to continue with the next task.
Back Button
- The Back button available from pop up screens will take the user back to the main record. From the main record, the Back button (
 ) will return the user to the List screen.
Navigating within the System
- Menus are collapsed in the menu box in the top left hand corner of the screen.
- User section is located in the banner on the top right of the screen.
- Main toolbar is located below the Page Title.
User Section
- The User Section includes access to these screens and functions:
- Welcome – The “Welcome” line indicates which user is currently logged on.
- Profile – The User Profile Screen includes user specifications and role assignments.
- Settings – The User Settings area includes set up for Widgets, Shortcuts, Favorites, and Recent Items.
- About – About Accolent ERP details version information.
- Logout – Users should click the Logout function to exit the application. After the user clicks Logout, the screen will change to the Log in screen.
Main Toolbar
- The Main toolbar and Menu options bar will allow you to navigate to different screens in the Accolent ERP system to create or edit records, transactions and other screens.
- The Main Toolbar includes various functional and navigational buttons.
- The Menus are collapsed into the menu box at the top left of the screen.
- At any time, a user can click a menu option to change menus or screens.
- If you are on a screen, you can choose to go to another page at any time by clicking the Menu or Sub-Menu option – if you have not saved your changes to the current screen, you will receive a warning before exiting the screen.
Screen Toolbar
- The Screen Toolbar is specific to the screen being displayed and will include buttons that perform actions related to that screen.
Screen Functions
- Screen Functions area usually includes an Actions, Imports, and Views (
 ) Menus, and a Comments Menu (
 ). These options are specific to the screen being displayed.
Screen Icons
- Common icons appear throughout the system.
Screen Filters
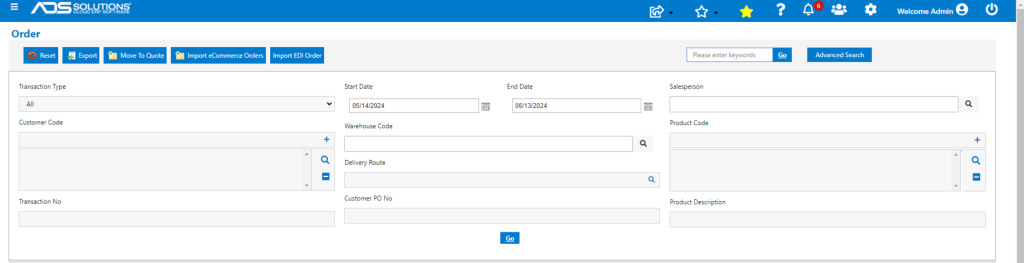
- Reports screens and some other screens include a Filters area that users can hide with the Hide Filter button to gain more screen display space.
- Filters are used to select and find data that is usually displayed below the filters.
Creating New Records and Transactions
- Entry screen can be accessed directly from the Menu option that indicates Create <Record> such as Create Customer or Create Order.
- An alternative is to access the appropriate list screen and click the () button on the screen toolbar.
- Usually, a new record cannot be created directly from a View/Edit Record screen.
Viewing/Editing a Record
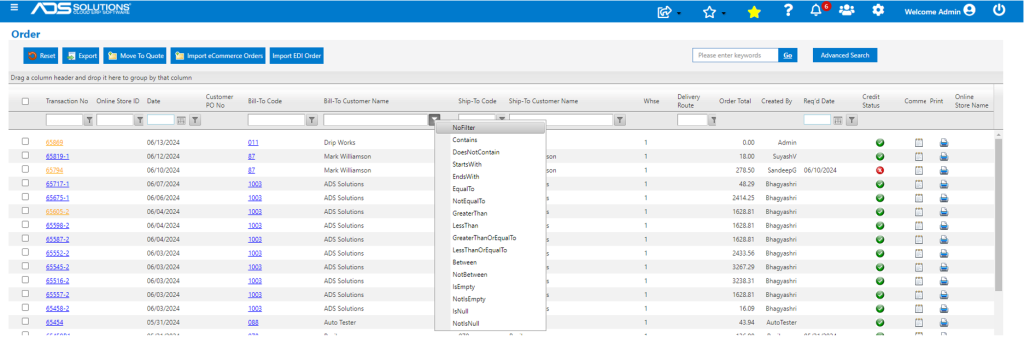
- View/Edit of an existing record starts with the list screen. Click on the blue colored text (hyperlink) to bring up the appropriate record.
- Use the grid sorting and filtering to find the specific item.
Exporting the List
- The first column in the grid in the list screen is usually a checkbox. Marking the check box indicates that the record is selected for a process.
- Click the (
 ) button on the screen toolbar to stimulate a file download. If no check boxes are selected for export, all items will be exported.
 - A spreadsheet file (XLS format) will be generated with the selected records.
- The download behavior may vary depending on the settings of the web browser in use.
Look Up Window
- The magnifying glass is what we call a look up button
- When clicked, it will bring up a look up window where the user can bring back one (or more) items
Direct Entry or Single-Select look up
- Generally, in a direct entry or single-select lookup field (
 ) a user can enter an item code or ID and continue to the next field or look up a value using the Look Up button (magnifying glass).
 - On the single entry look up screen just click the highlighted line to return the value to field.

Multiple-Select look up
- In a multiselect lookup (
 ) a user cannot directly enter an item code. Instead, the user can find the value using the Look Up button. Values are removed using the Remove button (
 ).
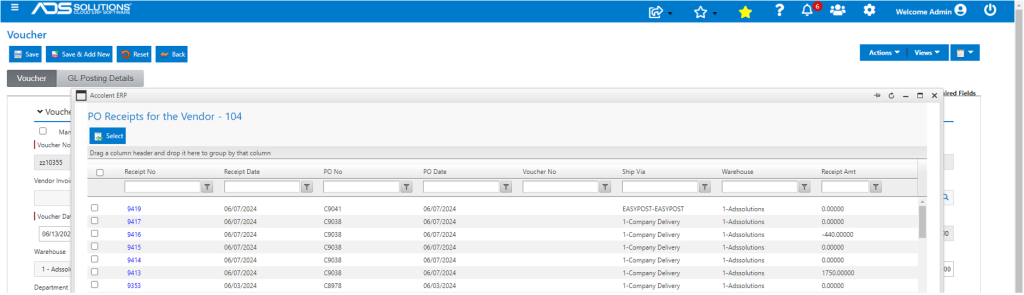
). - In the multi-select look up screen find values using the search bar if necessary or move to another page.
- Select the items to bring back, then click the Select button (
 )
)
Direct Entry or Multiple-Select Look Up
Direct Entry or Multiple-Select Look Up
- Some fields allow direct entry or multi-sect lookup (
 ).
). - To directly enter an item code type it in the input (first field) then press the ADD button (
 ). The value will appear in the selections box (second field). Multiple values can be found using the Look Up button to bring up a multi-select look up screen.
 - Remove values from the selections box by highlighting the value then clicking the Remove button ().
Sorting, Grouping, and Searching
- Sorting and searching help you find records quickly and are most often available from list or look up screens.
- All lists are sorted in one order or another usually by date or transaction number or ID code order. However, a user can choose whichever sort order works best to find an item.
- Click a column header label to sort the list by that value from smallest (or oldest) to largest (or most recent); click again to sort by largest to smallest; click again to remove the sort.
- An up or down arrow will indicate if you’ve sorted the column. Multiple columns can be sorted at once. For example, you may want to sort customers by state, then by customer name. Click the State column then the Name column to achieve this.
- Some lists will have the option to Group by fields in the display. To do this, drag a field header from the display and drop it in the Group Bar located just above the display.
- A simple search will find records that include all the search characters in order in the fields displayed on screen. When you search for “Dodge City” in the Search box on the Customer List screen, Accolent ERP will find all records with that search term in any of the fields displayed on screen.
- A Simple Search field is available on most List screens to make it easy to refine the list of items displayed. Type search terms in the simple search field and press the Go button to see search results that match the search criteria. Only active records will be displayed from a simple search.
- Generally, a simple search will find data in the fields displayed on the list screen. For example, the Customers list screen includes the customer code, name, address, keywords, etc. If the data in any of these fields matches the search terms, those records will be listed. (The exception is fields that display a currency value like totals or invoice amount.) To clear a search, clear the search terms and press the Go button.
- Additional search options are available in Advanced Search. Here active and/or inactive records can be searched and multiple search terms can be entered and directed to specific types of data.
- An Advanced Search gives you the chance to search by more than one field at a time. Let’s say you want to find all customers in City = Salem and State = Oregon. Customers in Salem, Massachusetts will not appear on the search list. Advanced Search also gives you the chance to include Inactive records in the search.
Entering Information
- Fields accept data to store or use. Use the TAB key or the mouse to move through the fields. When you are creating a new record, it is a good idea to move through the fields in order using the TAB key.
- Enter date information in the format MM/DD/YY, M/D/YY, or MMDDYY (month, day and year).
- Or use the Date Picker screen (
 ) to pick a date from a calendar.