
Accolent ERP is integrated with multiple eCommerce Stores (Shopify, Woo Commerce, Big Commerce, etc.) and multiple eCommerce marketplaces (Amazon, eBay, Etsy, Walmart, etc.) (collectively, “eCommerce Stores”). The integration is accomplished through a multi-channel connector, that links Accolent ERP to multiple eCommerce Stores using APIs and FTP Data Feeds. Using this integration, Accolent ERP users can manage the products and inventory on multiple eCommerce Stores and fulfill orders from all eCommerce Stores from Accolent ERP.
Overall Flow
The integration with multiple eCommerce Stores is done through a multi-channel connector using APIs and FTP Data Feeds. Data sent from Accolent ERP is updated through the connector to multiple eCommerce Stores. Similarly, orders from multiple eCommerce Stores flow through the connector into Accolent ERP. The overall flow is laid out sequentially below.
- Create an account for each eCommerce Store, download a theme and set up each store.
- Then ADS Solutions will create a connector account for you and configure it for your eCommerce Store(s).
- Each product in Accolent ERP can be selected for sale in one or more eCommerce Stores.
- Once assigned to eCommerce Stores, products will be loaded into the eCommerce Stores by FTP Data Feed. After the initial load of products, inventory quantity and other changes will be continuously updated by API from Accolent ERP to the eCommerce Stores.
- Orders placed in the eCommerce Stores are pulled into Accolent ERP through an API.
- The orders can then be fulfilled in Accolent ERP, and the eCommerce Stores updated with shipping details through an API.
Create eCommerce Stores
- Set up one or more eCommerce Stores; in this case, an eCommerce Store was created on Shopify using the Refresh theme.
- Set up the slideshow on the home page, then customize the theme and set up the eCommerce Store.
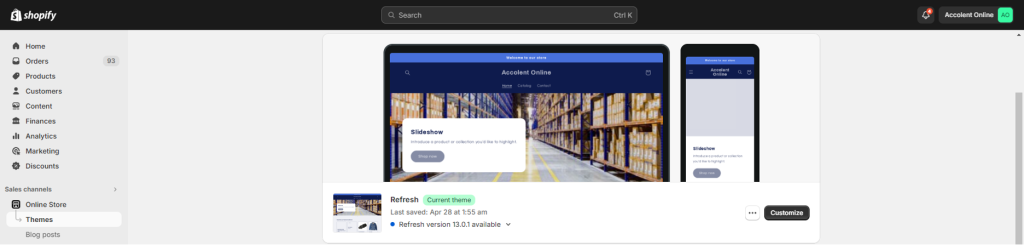
- The freight options and payment methods will also need to be set up.
- Once the store is created, enter the store credentials on the Accolent ERP eCommerce Stores Value List from Settings > Value Lists > Other Value Lists (A to L) > eCommerce Stores.

Connector Account
- ADS Solutions will create a connector account for you and enter the credentials on the Configuration screen.

- All of the eCommerce Stores will be set up as selling channels.
- ADS Solutions will also configure the FTP Data Feed to load the products from Accolent ERP into the eCommerce Stores.
Product CSV File
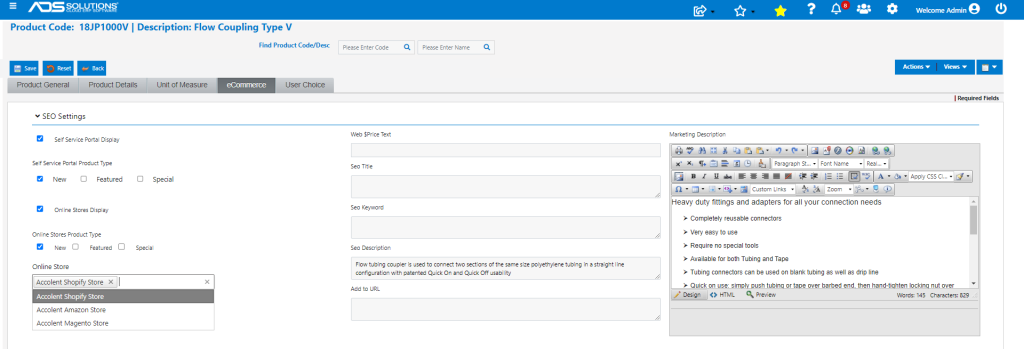
- The eCommerce Stores will appear in multiselect dropdowns on the Product Master and on the List Products screens in Accolent ERP.
- Using the multiselect dropdown, each product in Accolent ERP can be selected for sale on one or more eCommerce Stores.
- Products can also be assigned to eCommerce Stores programmatically based on some rules.
- Go to List Products, select the eCommerce Store and search to get a list of the products for that eCommerce Store.
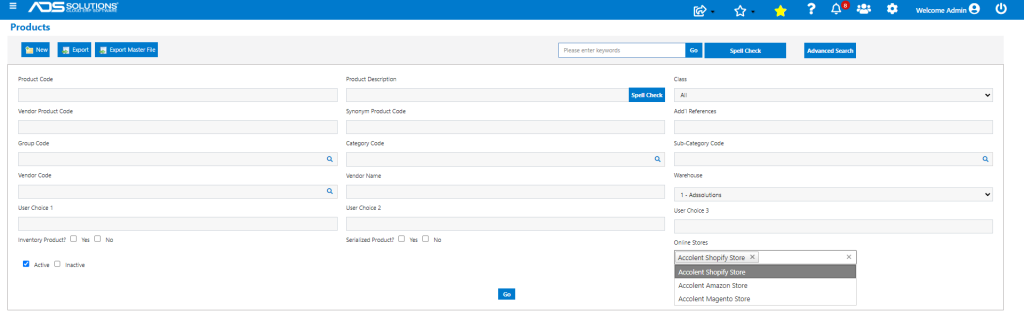

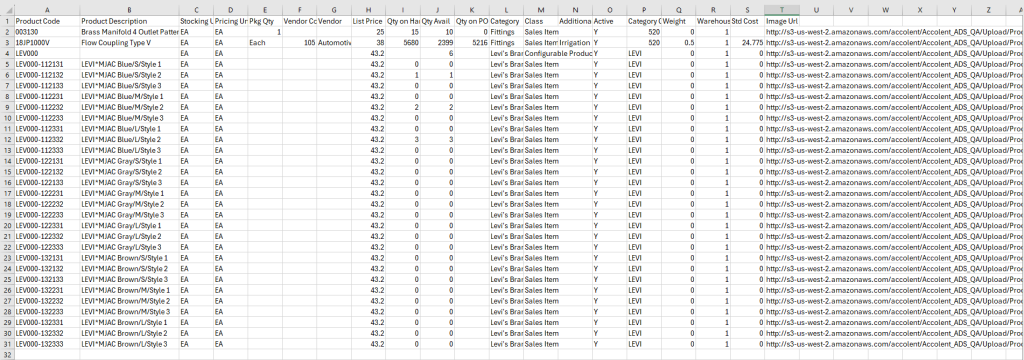
- Then click the Export button to get the CSV that can be uploaded to the eCommerce Store by FTP Data Feed.
- Once a CSV file is created for each eCommerce Store, we will push the products by FTP Data Feed to the eCommerce Stores.
Products Loaded into eCommerce Stores
- Once the FTP Data Feed is run all these products will be pushed to the eCommerce Stores.
- Go to the eCommerce Store and the products and images should be visible.
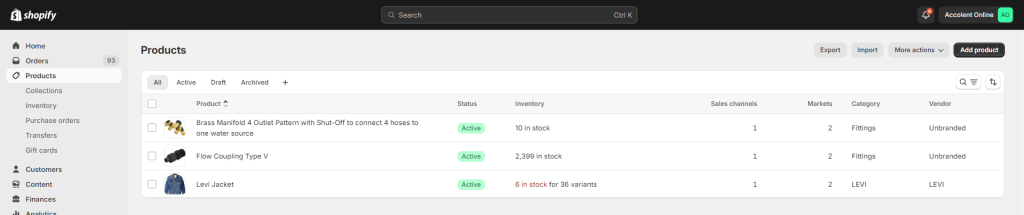
- This completes the initial loading of the products into the eCommerce Stores.
- An FTP Data Feed can also be used at any time, in either New or Update mode, to push new products and update product changes from Accolent ERP to the eCommerce Stores.
Product Update API
- An Accolent ERP API updates the eCommerce Stores whenever (1) the inventory quantity of any eCommerce Product changes or (2) other changes (e.g., price, description) to any eCommerce Product are saved.
- Through this API, the inventory quantity of all products offered on the eCommerce Stores will be continuously in sync with Accolent ERP.
Orders Placed in eCommerce Stores
- Customers will browse to the eCommerce Stores and create orders.
- Customer (1) selects products and adds them to the shopping cart, (2) clicks on checkout and adds Contact information and Shipping address, (3) selects from the configured shipping options (e.g., Free, Economy, Standard, Premium) and (4) pays by credit card. The order is then created in the eCommerce Store.
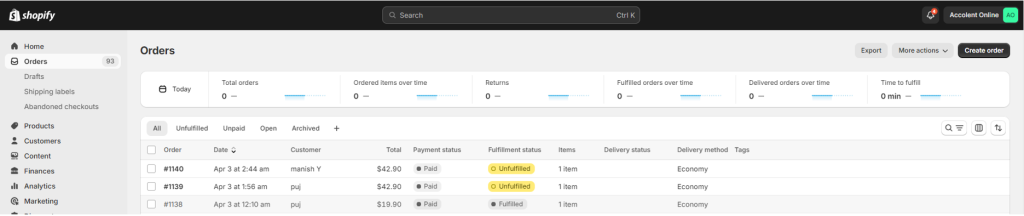
eCommerce Orders Pulled into Accolent ERP
- Orders that have been successfully placed in the eCommerce Stores are then pulled into Accolent ERP.
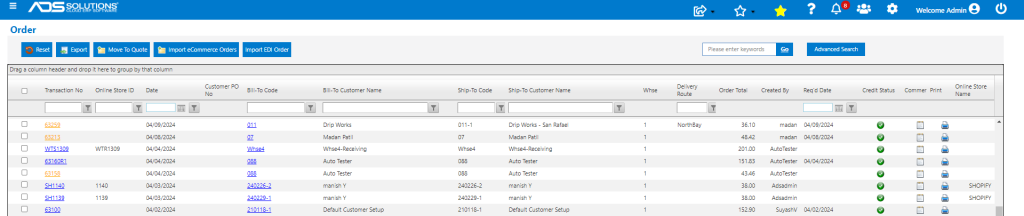
- From the Accolent ERP List Orders screen, click on the Import eCommerce Orders button to pull orders into Accolent ERP.
- Accolent ERP automatically (1) either identifies existing customers or creates new customers, then (2) imports the eCommerce orders into Accolent ERP.
- The imported eCommerce Orders will be identified by the eCommerce Store they originated from and will show the eCommerce Store order no., as well as an Accolent ERP order no. For example, eCommerce Store Order No 1140 will be pulled into Accolent ERP as SH1140 (where “SH” is the store code that was set up).
eCommerce Order Payments
- If the eCommerce store is able to accept an Authorize.Net gateway/Fiserv processor, since these are already integrated with Accolent ERP, payments will be pulled directly into Accolent ERP when made.
- If the payments made on the eCommerce Stores are taken through a third-party gateway/processor, Accolent ERP will not be able to make payment receipts for these orders.
- These third-party gateway/processor orders will have an open AR entry and show as unpaid. When payment is received a payment receipt will need to be made either (1) manually, or (2) by uploading a CSV of all payments and charges made through a particular processor and this can be used to make all the payments programmatically.
Fulfill eCommerce Store Orders
- To fulfill eCommerce Store orders in Accolent ERP, first click on Move to Fulfillment.
- Once orders are moved into fulfillment, they can be set to either automatically print each order’s pick ticket, or the orders can be batched, and a master pick ticket printed manually.
- Then warehouse personnel can pick the orders either singly or in batches.

- Orders can be packed and shipped one-at-a time from within the orders or using the Quick Pack & Ship icon on the Orders in Fulfillment screen. If orders are packed in multiple boxes, they cannot use the Quick Pack & Ship icon.
- Orders can be packed in boxes and shipped through multiple carriers and tracking numbers obtained and shipping labels printed.
- Accolent ERP automatically updates the shipping details to the eCommerce Store that the orders were placed on.
Move Orders to Invoice
- Once orders are shipped click on the Move to Invoice button, to mark the orders as invoiced.
- When invoiced, payments collected on the eCommerce Store can be applied to the invoices and both the invoices and payments are posted to the General Ledger.