
For Restaurant Supply distributors, Accolent ERP provides an easy linkage with AutoQuotes (“AQ”). Using AQ, distributors can create AQ Projects and then download these as pre-configured CSV files. These CSV files (“AQ Export CSVs”) can be zipped and then imported into Accolent ERP as orders. To create an order in Accolent ERP, first create the order header specifying the Customer, terms, etc., then import the zipped AQ Export CSV. From the AQ Export CSV, the system will first automatically create any new vendors and products that are not already in Accolent ERP. Then the system will automatically create the order lines in Accolent ERP. Once the order is created in Accolent ERP, it can be sent to the Customer, edited and/or moved to fulfillment as needed.
Accolent ERP Setup Step
- Accolent ERP comes with default records for Customer, Prospect, Vendor and Product (named DEFAULT Customer, DEFAULT Prospect, etc.), already set up. See this wiki: Default Customer Vendor Product Records.
- Review these default records and make sure these settings are acceptable as they will be used to populate fields where the AQ record provides insufficient detail.
AQ Setup Steps
- Log on to AQ as usual and create an AQ project.
- There are two one-time settings that need to be made in AQ from the Admin Settings menus.
- First, add four custom columns to the AQ Spreadsheet:
- CustomColumn1 will be used for the Accolent Vendor Code
- CustomColumn2 will be used for the Accolent Product Code,
- CustomColumn3 will be used for the Accolent Product Description, and
- CustomColumn4 will be used to designate whether the product is a Sales item or a Special Order item.
- Second add the four custom columns CustomColumn1, CustomColumn2, CustomColumn3, and CustomColumn4 to the AQ Generic CSV export to create a Custom AQ Export CSV template.
- First, add four custom columns to the AQ Spreadsheet:
- See this Accolent Help wiki Creating an AutoQuotes Export which explains how to do these one-time setup steps in AQ.
AQ Project Creation
- Once the one-time AQ setup steps are completed, create the AQ Project by entering the Customer (which should already exist in Accolent ERP) and a list of products onto the AQ Spreadsheet.
- The AQ Spreadsheet looks like this:
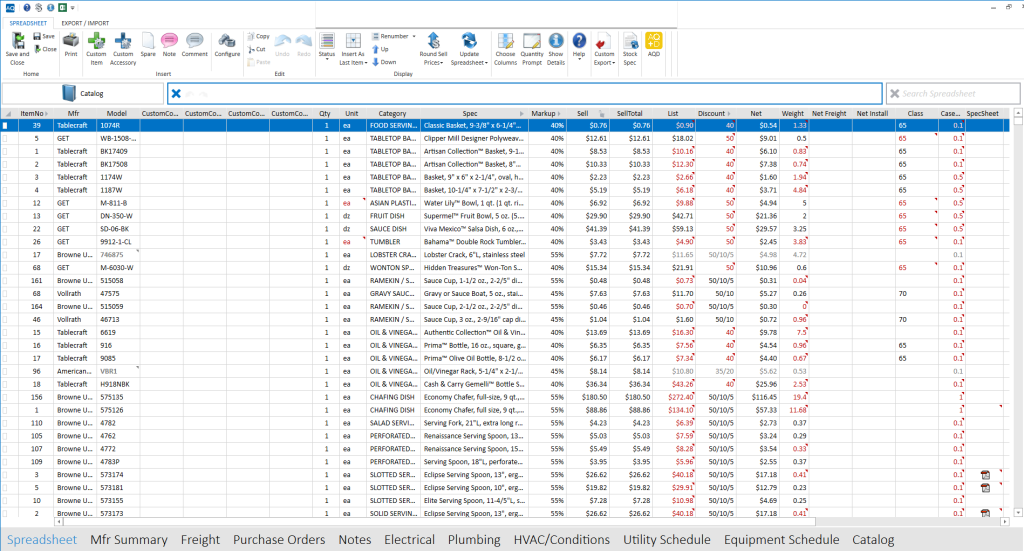
- The four custom columns that were added may be populated either in the AQ Spreadsheet or in the CSV file that will be exported from AQ.
- Once the AQ Project is complete Save, then:
- Either download the printed Quote directly from AQ, print and send Quote to Customer, or
- Create the AQ Export CSV file and import it to create the Quote in Accolent ERP.
- If printed from AQ, the Quote looks like this:
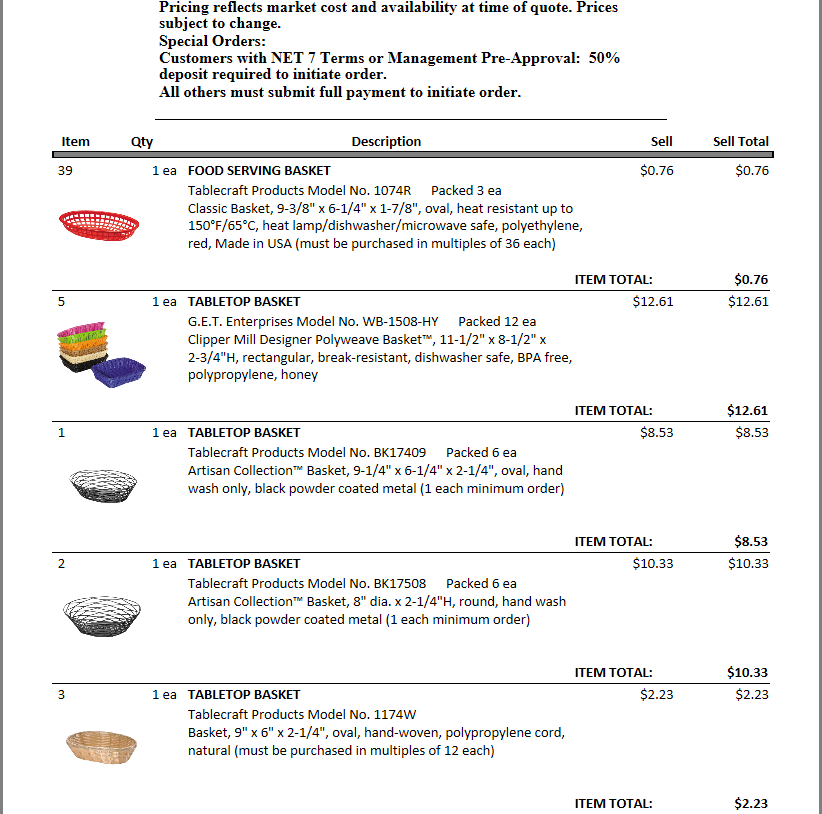
- If the Quote is to be used to create a quote/order in Accolent ERP, first download the AQ Export CSV file then import it into Accolent ERP and it can be sent to the Customer from Accolent ERP.
- More typically though, the Quote will be managed in AQ, so that changes can be made easily, until finalized with the Customer. Then once finalized, the AQ Export CSV file can be imported to create an order in Accolent ERP.
Additional Information Needed in the AQ Export CSV
- As noted above, the Vendor Code and four custom columns may be populated either on the AQ Spreadsheet or on the AQ Export CSV. Note that if entered into the AQ Export CSV file, care has to be taken to not lose leading zeros.
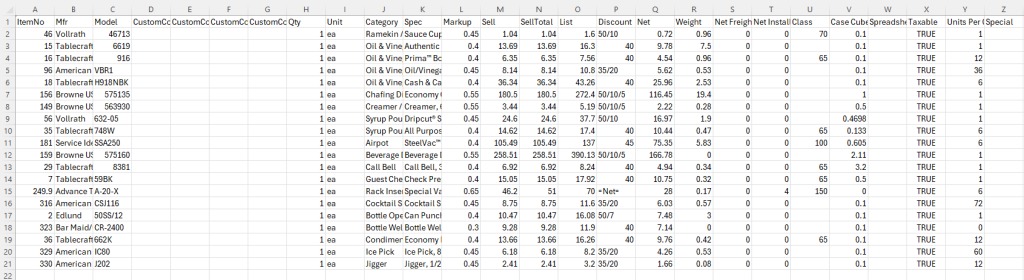
- CustomColumn1 – Enter the Accolent ERP Vendor Code in CustomColumn1 (D); if CustomColumn1 (D) is left blank, this means that the Vendor doesn’t exist in Accolent ERP and will be made with a system-generated Vendor Code.
- CustomColumn2 – Enter the Accolent ERP Product Code in CustomColumn2 (E); if CustomColumn2 (E) is left blank, this means that the Product doesn’t exist in Accolent ERP, and a new product will be made with Product Code the same as the Model (C).
- CustomColumn3 – Enter the Accolent ERP Product Description in CustomColumn3 (F). This can be created by copying and editing the Spec (K). If CustomColumn3 (F) is left blank, the product description will read the first 30 characters of the Spec (K).
- CustomColumn4 – Enter the Accolent ERP Product Class as S (Sales) or SP (Special Order) in CustomColumn4 (G); if CustomColumn4 (G) has any entry other than S or SP, the product will be imported as Class S by default.
Example of an AQ Export CSV
- This is the AQ Export CSV file:
Import of Vendors, Products and Quote/Order Lines
- First manually open a Quote/Order in Accolent ERP and enter all the Header information.
- Go to Sales > Order and enter Order No, Customer Code, Ship-To Customer, Warehouse, Terms, Salesperson, Tax Jurisdiction – all of these entries will be defaulted once the Customer Code is entered.
- Then go to the products tab and from the Imports menus, select AutoQuotes Import.
- Point to the AQ Export CSV file and click Go.
- This will import the AQ Export CSV file into Accolent ERP in 3 sequential steps: (1) first creates any Vendors not already in Accolent ERP, (2) second, creates any Products not already in Accolent ERP and (3) finally, creates the Quote/Order in Accolent ERP.
Vendors
- The first step imports any Vendors on the AQ Export CSV, that are not already in Accolent ERP, into the Vendor Master; if a Vendor is already in Accolent ERP then this step is skipped.
- The application will import all the Vendors into the Accolent ERP Vendor Master as follows:
-
- VENDOR CODE – Reads from CustomColumn1 (D); if CustomColumn1 (D) is blank creates a new Vendor with a system-generated Vendor Code.
- VENDOR NAME – Reads from Mfr (B).
- SHIPPING ADDRESS – Uses DEFAULT Vendor. Can be changed later.
- COUNTRY – Uses DEFAULT Vendor. Can be changed later.
- STATE – Uses DEFAULT Vendor. Can be changed later.
- ZIP CODE – Uses DEFAULT Vendor. Can be changed later.
- ACTIVE – Defaults to Y.
- WAREHOUSE – Uses DEFAULT Vendor. Can be changed later.
- SHIP VIA – Uses DEFAULT Vendor. Can be changed later.
- TERMS – Uses DEFAULT Vendor. Can be changed later.
- DEPARTMENT – Uses DEFAULT Vendor. Can be changed later.
- Upon completion of the AQ Import, there will be a CSV file created showing all the Vendors that did not import correctly.
- Review and correct all Vendors imported.
Products
- After completing the Vendors import, the second step imports any Products that are not already in Accolent ERP into the Product Master; if a Product is already in Accolent ERP, this step is skipped.
- There are 3 types of spreadsheet line-items that can be on the AQ Project:
- Products – these will have a value in Model (C), a Qty (H) and an alphanumeric value (e.g., “EA” or “DZ”) in Unit (I). These will be imported into Accolent ERP as Products. If there is no value in Model (C), then the row will be an Accessory Product to the nearest prior Product.
- Accessory Products – these will have no value in Model (C), a non-zero value in Qty (H) and an alphanumeric value (e.g., “EA” or “DZ”) in Unit (I). These will be imported into Accolent ERP as Products that are Accessories to the nearest prior Product Code in CustomColumn2 (E) or Model (C). They will have a Product Code of the form Model-Ann, where Model (C) is the preceding Product, and the suffix A denotes Accessory and nn is a numeric. They will be recorded as Accessories to the preceding Product.
- Product Order Line Item Comments – these will have no value in Model (C), a non-zero value in Qty (H) and no value in Unit (I). These will be imported into the Product record as Product Order Line Comments (e.g., 1 year limited warranty, standard). Each such comment will apply to the nearest prior Product Code in CustomColumn2 (E) or Model (C) in the spreadsheet. If Product Order Line Comments have a non-zero value in Sell (M), they will retain the value in Net (Q). If these optional items are selected, the user will need to make a non-inventory product and add it to the order.
- The application will import all the Products (that have a non-zero Qty (H) and an alphanumeric value in Unit (I)) into the Accolent ERP Product Master as follows:
-
- PRODUCT CODE – Reads from CustomColumn2 (E); if the field is left blank, uses the Model (C).
- PRODUCT DESCRIPTION – Reads from CustomColumn3 (F); if the field is left blank, reads the first 30 characters of the Spec (K).
- PRODUCT CLASS – Reads from CustomColumn4 (G); if the field has any entry other than S or SP, imports as Class S by default.
- CATEGORY CODE – Uses DEFAULT Product. Can be changed later.
- SUB-CATEGORY CODE – Uses DEFAULT Product. Can be changed later.
- ACTIVE? – Defaults as Y.
- INVENTORY PRODUCT? – Defaults as Y.
- SERIALIZED PRODUCT? – Defaults as N.
- CATCH WEIGHT PRODUCT? – Defaults as N.
- LOT CONTROLLED? – Defaults as N.
- BACK ORDER? – Defaults as Y.
- MINIMUM SELLING QTY – Uses DEFAULT Product. Can be changed later.
- PRIMARY VENDOR CODE – Reads from CustomColumn1 (D).
- VENDOR PRODUCT CODE – Reads from Model (C).
- COMMISSION TYPE? – Uses DEFAULT Product. Can be changed later.
- TAX CODE – Reads from Taxable (X) and enters Y for TRUE or N for FALSE.
- UOM – Reads from Unit (I).
- STOCKING UOM – Defaults as Y.
- UOM RATIO – Defaults as 1.
- SELLING UOM – Defaults as Y.
- DEFAULT SELLING UOM – Defaults as Y.
- PO UOM – Defaults as Y.
- DEFAULT PO UOM – Defaults as Y.
- PRICING UOM – Defaults as Y.
- PRICE FACTOR – Defaults as 1.
- PRICE – Reads from Sell (M).
- DESCRIPTION 2 – Reads from Spec (K).
- PRODUCT ORDER COMMENTS – If column I is blank and column H-Qty is non-zero, then reads from Spec (K).
- STANDARD COST – Reads from Net Price (Q).
- V102-1 COST – Reads Cost type from V102-1 (e.g., Alternate Cost) and reads this Alternate Cost from Net (Q).
- Upon completion of the AQ Import, there will be a CSV file created of all the Products that did not import correctly.
- Review and correct all Products that were imported, then verify things like the Primary Vendor Code.
Import of Quote/Order Lines
- Once products are successfully imported into Accolent ERP then the final step is to create the Quote/Order.
- The application will import into the Quote/Order (in the same sequence as on the AQ Export CSV) the following AQ line items:
- Products – these were already imported into the Accolent ERP product master.
- Accessory Products – these were already imported into the Accolent ERP product master.
- Product Order Line Comments – these were imported into the product master as Product Order Line Comments.
- The application will import all the Product lines and Product Order Line Comments into the Accolent ERP quote/order as follows:
-
- TRANSACTION NO – Already manually entered on General tab.
- PRODUCT CODE – Reads from CustomColumn2 (E) or Model (C).
- ORDER LINE COMMENTS – Reads from Spec (K).
- UOM – Reads from Unit (I).
- QUANTITY – Reads from Qty (H).
- PRICE – Reads from Sell (M).
- TAX CODE – Reads from Taxable (X) and enters Y for TRUE or N for FALSE.
- DEPARTMENT CODE – Defaults based on Customer selected on General tab.
- Once the import is complete, the quote/order will be available in Accolent ERP.