
Accolent ERP runs in the AWS Public Cloud and uses PrintNode or Google Cloud Print to print from the Cloud. We recommend using PrintNode which is an enterprise-grade cloud printing solution, but you may also use Google Cloud Print if you prefer. If you are using PrintNode, download the PrintNode client on to the printer server; if you are using Google Cloud Print, first set up Google Cloud Print and associate the printers with the Google Group. The second step is to add all the printers set up in PrintNode or Google Cloud Print to Accolent ERP. After adding the printers, the final step is to create Printer Groups and Assign Forms to Default Printers as described in this wiki.
These wikis, detail the process:
- Setting up Accolent Cloud Printing (PrintNode)
- Setting up Google Cloud Print
- Adding Printers to Accolent ERP
- Setting Printer Groups and Assigning Forms
Create a Printer Group
- Typically, printer groups will be set up by location – e.g., printer group “Whse2-Front” may be the printers in the front office of Warehouse 2.
- Select Settings > Printing & Sending > Printer Groups.
- This will display all the existing Printer Groups already set up.
- To add a new printer group, click on the New button, which brings up the Printer Group screen.
- Enter Printer Group No, Name and Description and Save.

Link a Printer to a Printer Group
- Once the Printer Group has been set up, link Printers to the Printer Group.
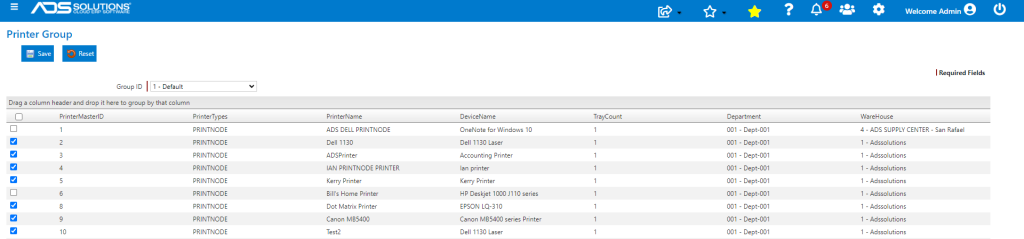
- Go to Settings > Printing & Sending > Assign Printers to Printer Groups.
- Now either select from the dropdown list or enter the Group ID of the printer group to assign.
- The grid will return all the available printers that have been set up and are available to be assigned to the printer group.
- Select from the grid the printers to assign to this printer group and then Save.
Assign Forms to Printers
- Assign the forms to be printed to printers.
- Select Settings > Printing & Sending > Printer Groups.
- Click on the hyperlink for the Printer Group to link forms to printers.
- For each type of Form, select the Options (PDF, LAN Printers, Internet Printers, Google Printers), then select the Printer.
- Once selected all the trays that the printer has available will be shown; select from the trays and specify the number of copies.
- Enter the No of Copies for each Tray.
- Then click Save.
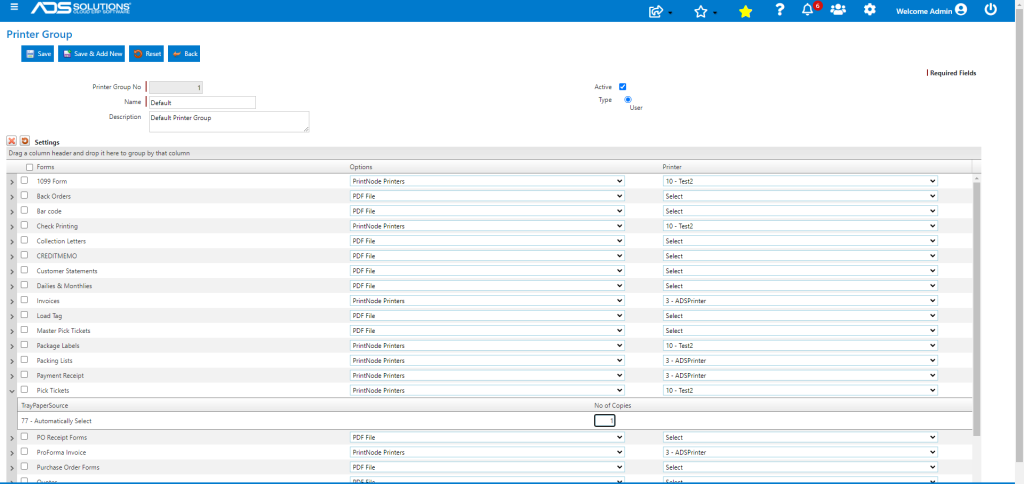
- Repeat this for all the forms that need to be printed.
Associate Users with Printer Groups
- Go to Settings > Users List and click on a User ID hyperlink to launch the screen.
- From the Printer Group dropdown, select the Printer Group to associate this User with and Save.
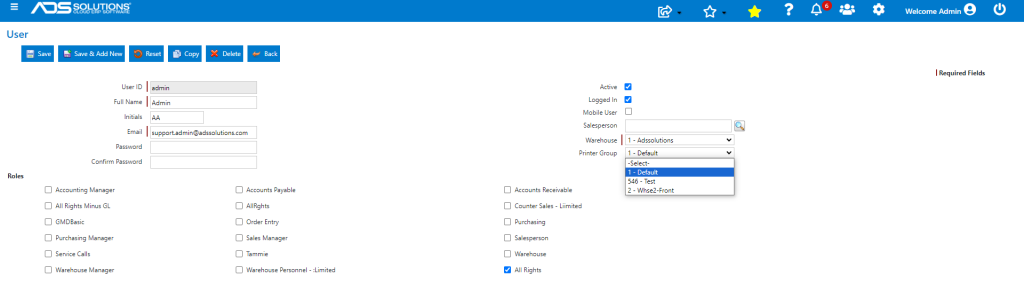
- When the user prints a particular form it will automatically go to the printer the user has set up for that form.