
The Accolent ERP Self-Service Portal allows Customers’ employees (“End-Users”) to place orders, review the status of their orders, look up their prior transactions, review their Statements and pay invoices. This allows the Accolent user to deliver better service to its Customers with fewer sales and service personnel, increasing efficiency and reducing cost. The Self-Service Portal is a separate website that is linked to Accolent ERP and allows access to only those Customers and their End-Users that have been approved for Self-Service Portal access. Customers will get the same pricing, terms, shipping methods, etc., on the Self-Service Portal as they would get in Accolent ERP. Once signed onto the Self-Service Portal, Customer’s End-Users have a number of ways to search for products to order and then complete the order in the self-service portal.
Creating Orders in the Self-Service Portal
Adding Products to the Cart
- To add products from the Home page, any search, any product details page, the Order Guide or the Recent Purchases, enter the desired quantity and click on the Add to Cart button.
- This will put the item quantity into the Cart at the top right-hand side of the screen.
- The Cart will keep a running total of the quantity of items (not number of products) in the Cart as well as the extended price total.
Adding Products from a Search
- To search for products, enter some portion of the product name or code and use the Search bar at the top of the screen.
- Use the button on the right of the Search bar to select whether to search the whole Catalog or just the Order Guide.
- Use the Category/Sub-Category dropdown on the left of the Search bar to specify where to search or to pull up a whole Category or Sub-Category, select it from the dropdown and search without entering anything in the Search bar.
- For example, Search for Irrigation > Fittings in the Search bar.
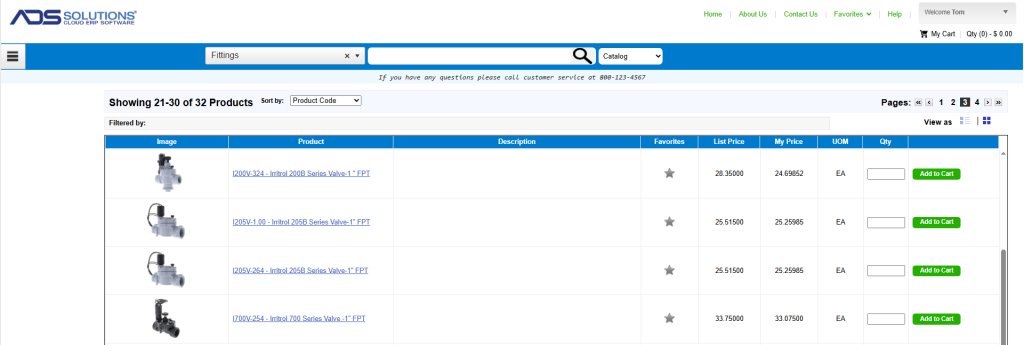
- The search results can be displayed in a grid or tile view.
- To add products from a Search grid or tile view, enter the quantity in the Qty field and click Add to Cart.
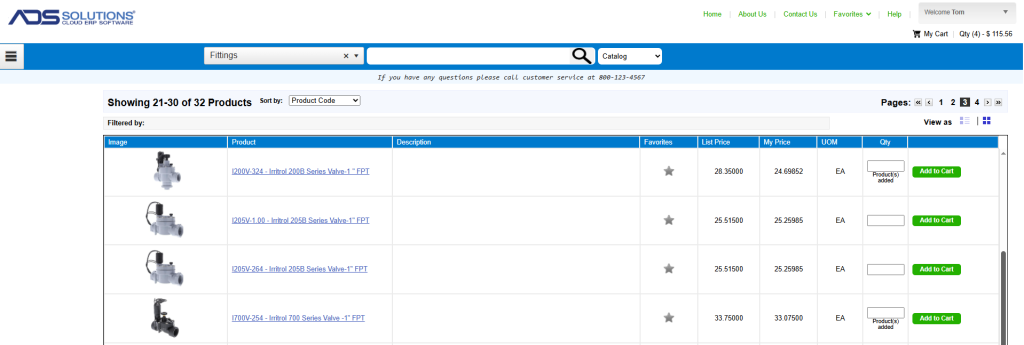
- For example, add 2 EA of I200V-324 and 2 EA of I700V-254 to the Cart.
- Each added item will show a “Product(s) added” message to safeguard against adding the same product being added multiple times from the grid.
Adding Products from Order Guides
- Order Guides may be set up to facilitate quick entry of orders by End-Users.
- If an Order Guide has been set up, an End-User can open it from the Order Guides menu.
- The Order Guide will already have the products to be purchased set up, so the End-User can go down the Order Guide and enter lines to the Cart just as from the search.
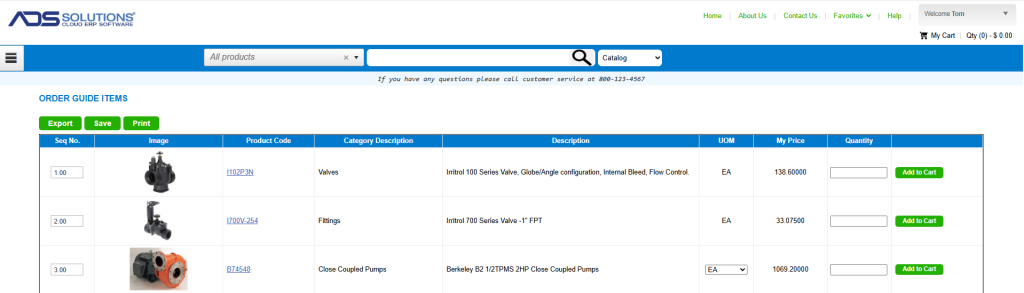
- Order Guides can also be sequenced by End-Users to conform to the layout of their warehouses and then printed and used to record their re-order quantities.
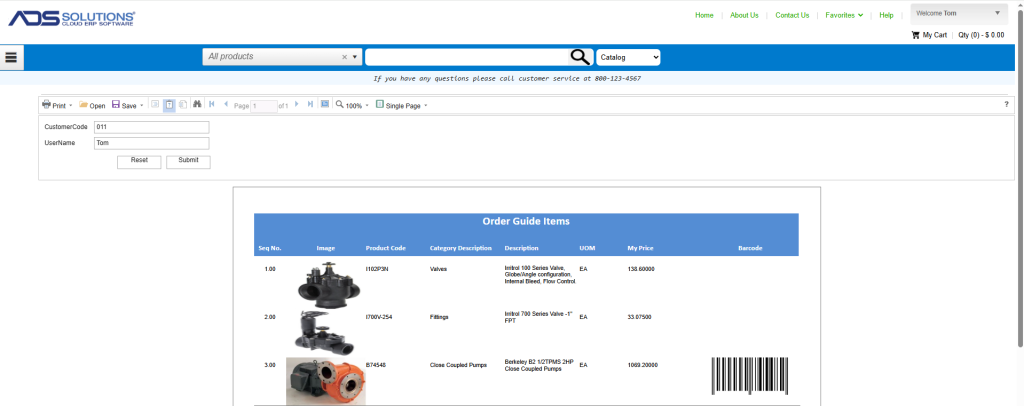
- Then the quantities recorded on the printed Order Guide can be used to quickly enter the Self-Service Portal order.
Adding Products from Recent Purchases
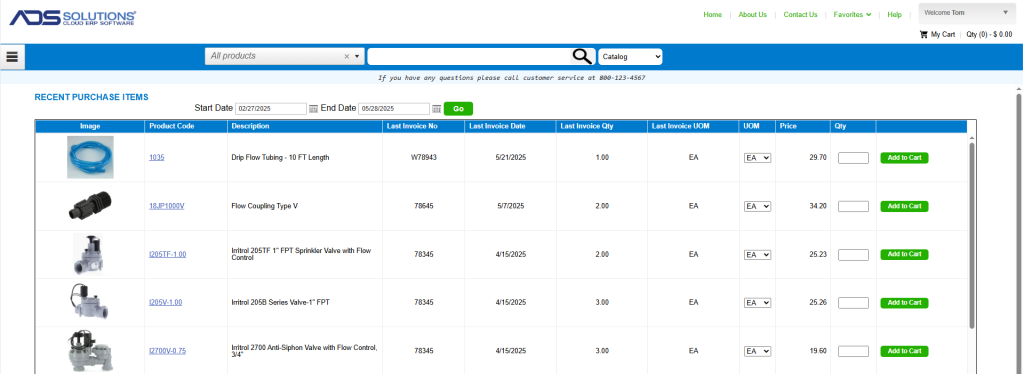
- The Recent Purchases screen is similar to the Order Guides in that it lists commonly purchased products.
- It can be filtered by a date range if, for example, purchases are seasonal.
- It also shows when products were last purchased and in what quantity and at what price.
- The End-User can go down the Recent Purchases screen and enter lines to the Cart just as from the search.
My Cart
- The Cart at top right shows the number of items (not number of lines) added to the Cart.
- Products may be added to the Cart from the Home page, the Catalog search grid or tile view, the Order Guide, the Product Details page, or the Recent Purchases page. All work the same way: the End-User enters the desired quantity and clicks the Add to Cart button.
- The Cart at the top right-hand side of the screen keeps a running total of the quantity of items (not number of products) in the Cart as well as the extended price total.
- The Cart persists all entries which will still be there if the user logs out and comes back at some later point.
- To display the contents of the Cart at any time click on the My Cart link next to the Cart icon.
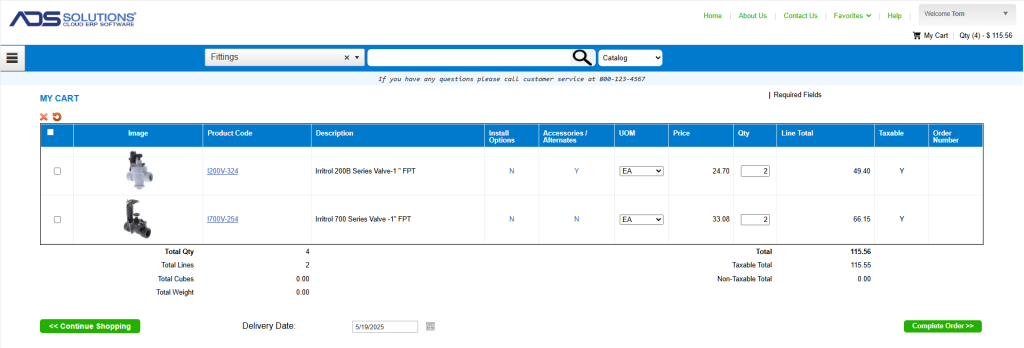
- From the My Cart screen, the items in the Cart may be modified to:
- Delete a product by selecting the checkbox to the left of the Product Code and clicking the red x icon at the top of the grid,
- Add Install Options and/or Accessories / Alternates to the order;
- Select a different UOM, if available, or to
- Change the quantity of a selected line item by updating the Qty field.
- If not finished select the Continue Shopping button to return to the Catalog or Order Guide to add further items to the Cart.
- If the End-User inadvertently logs out before completing the order, the Cart will persist the selections and reload the contents of the Cart at the End-User’s next log on.
- When done, select Complete Order.
Completing the Order
- Click the Complete Order button to move to the next screen.
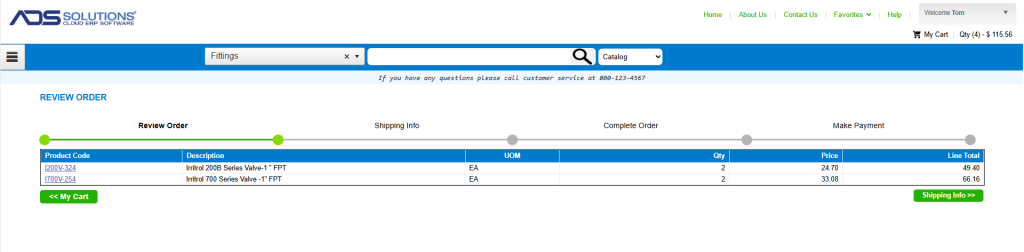
- The Review Order screen allows the End-User to verify the order details.
- Clicking on the My Cart button allows corrections or further items to be added to the order
- When done click on the Shipping Info button to continue.
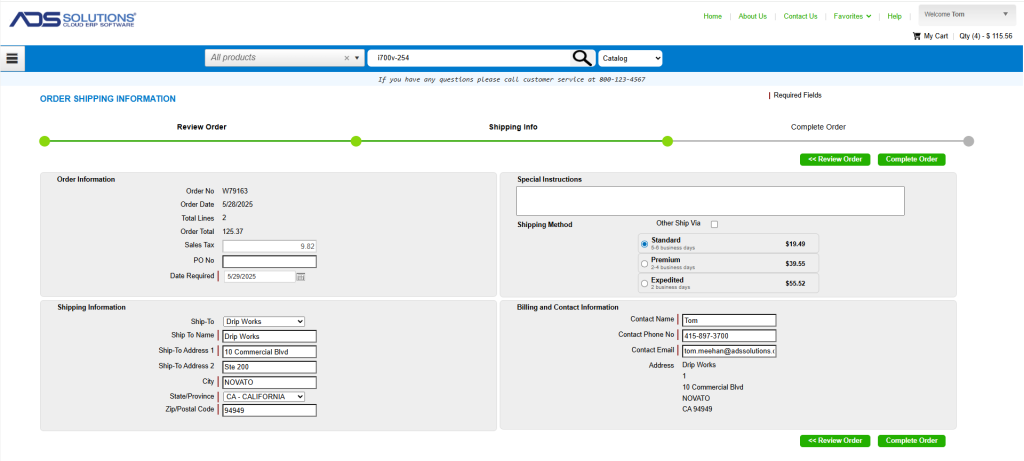
- Fill in all the required information fields on the screen.
- Enter the Customer’s PO No, if applicable, for future reference purposes.
- Modify the Date Required field, if necessary, to notify the supplier of requirements; since this is not a committed ship date, the supplier may or may not be able to accommodate this date.
- In the Shipping Information section, verify and/or change the delivery address, if necessary; if Customer has multiple ship-to addresses in the system, these will be available from the drop down.
- Enter specific instructions regarding shipping.
- Select from the Other Ship Vias or the allowed Shipping Methods.
- In the Billing and Contact Information section enter the required contact information.
- When done, select Complete Order to continue, or select Review Order to go back if necessary.
- The order is now complete.
Customers on Credit Hold
- The Self-Service Portal allows orders to be made by Customers that are on Credit Hold in Accolent ERP.
- Orders for these Credit Hold Customers when released from the Self-Service Portal, will show up in Accolent ERP but will still be on Credit Hold in Accolent ERP.
- Accolent ERP users will be able to call the Customer to discuss clearing the Credit Hold or manually clear the Credit Hold if desired.
- If a Customer on Credit Hold places an order on the Self-Service Portal and pays in full for the order, the order will show in Accolent ERP as having been released from Credit Hold.
Paying for an Order
- On completing the order, the End-User will be offered the choice of paying at this point.
- To pay for the order select “Yes”, then enter the credit card or ACH information.
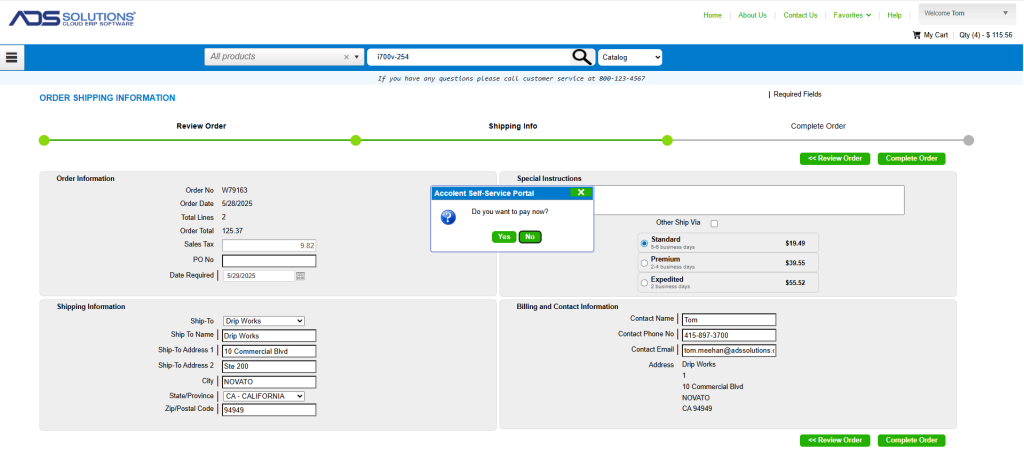
- If the Customer has established credit terms, selecting “No” will put the transaction on account.
- If the Customer has a credit status of “COD,” the Customer will be required to pay in full for the order.
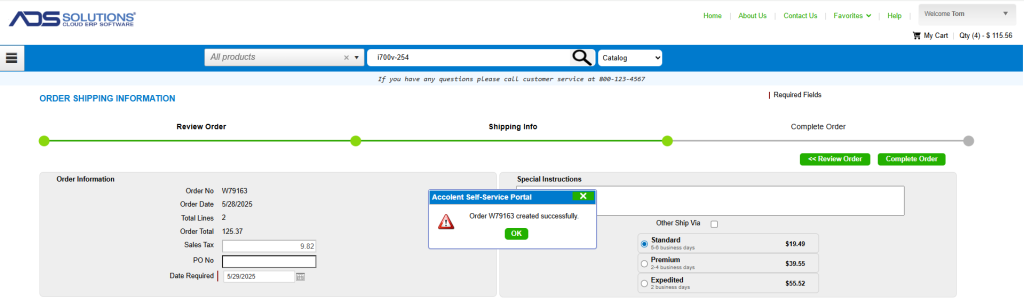
- When compete the End-User will receive the message that order W79163 was successfully completed.
- The order can be seen from the Lookup Transactions screen.
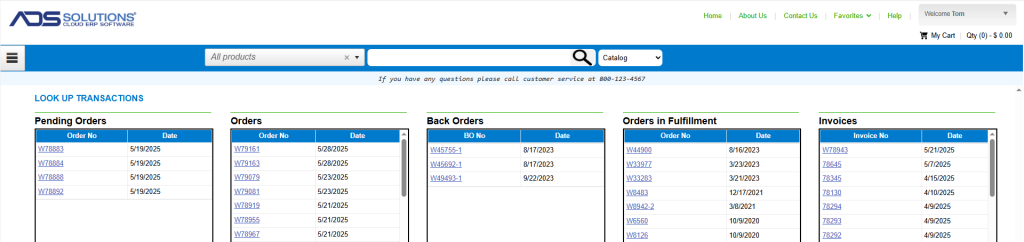
- Click on the hyperlink to open order W79163, which can be printed.
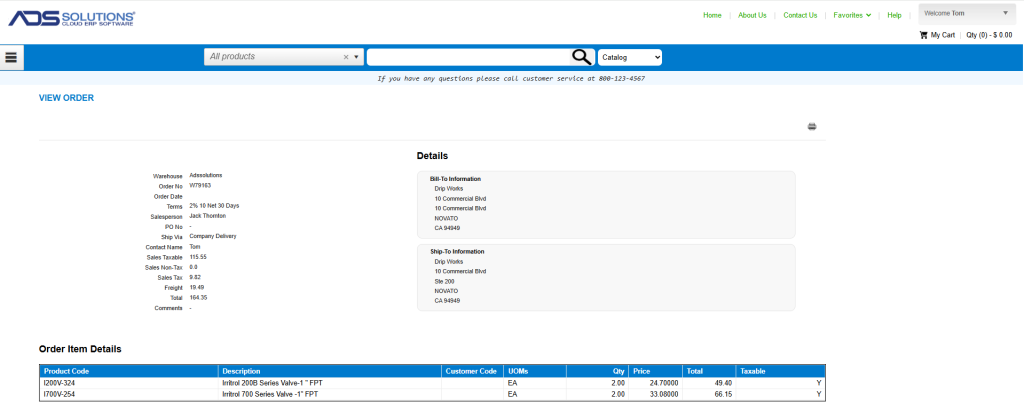
- The order is immediately available on Accolent ERP.

- Note that the Customer 011 has unpaid AR and so is on Credit Hold. The Self-Service Portal doesn’t block the order, but once made the order will show the Credit Hold in Accolent ERP. The Accolent ERP user can either contact the Customer or override the Credit Hold.